
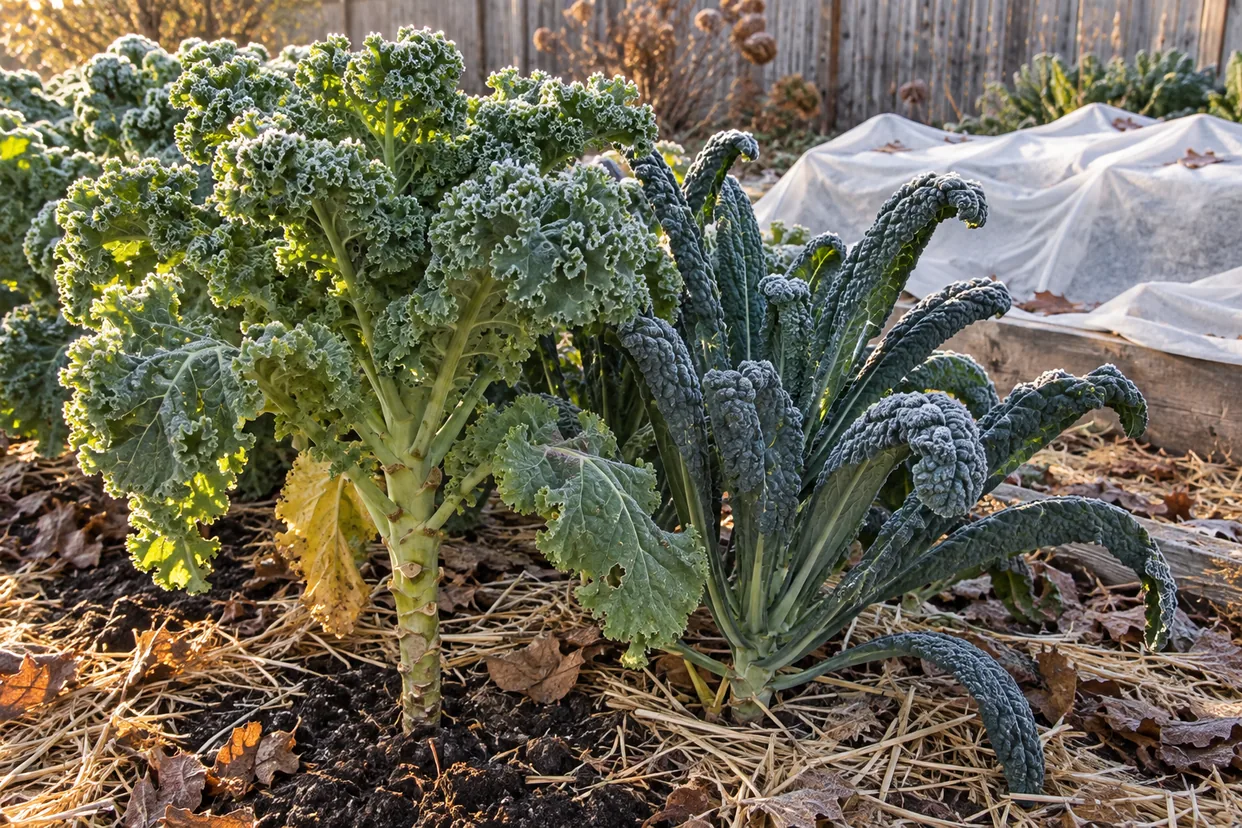
Kale is the vegetable that keeps giving. You plant it once, pick a few leaves every week, and the plant keeps making more for months. It shrugs off frost that kills tomatoes and peppers overnight, and the cold even makes it taste better. Growing Kale is one of the easiest ways for a beginner to put fresh greens on the table in spring, autumn and much of winter.
This guide covers the whole cycle, from sowing to the last winter harvest. The advice comes from University of Maryland Extension and the Clemson Home and Garden Information Center.
Why Growing Kale Is Worth It
Kale is a member of the cabbage family. In fact, Clemson describes it as “a headless cabbage”: the same species, but one that never forms a head. Instead, it puts its energy into a tall stem covered in leaves. That habit is what makes it so productive, because you can harvest the leaves one by one while the plant keeps growing.
Clemson also calls kale the ultimate leafy-green health food, both nutritious and high in fiber. Moreover, it is one of the most cold-hardy crops in the garden. For the wider family, including broccoli and cabbage, see Growing Brassicas: Cultivating Broccoli and Its Relatives in Your Backyard.
Choosing a Kale Variety
There are more kinds of kale than most shoppers realise. The Clemson article on kale and its factsheet describe several:
- Curly kale. ‘Darkibor’ is dark green and tightly curled, reaching about 2 feet tall and wide in 75 days. ‘Vates Blue Curled’ has ruffled blue-green leaves on 18-inch plants. ‘Winterbor’ is very cold hardy, with bright green new leaves that turn blue with age.
- Tuscan kale. Also sold as ‘Lacinato’, it has narrow, strap-like, puckered leaves in blue-gray, on plants 2 to 3 feet tall.
- Red kale. ‘Red Russian’ has smooth, lobed leaves with red veins. However, Clemson notes that Red Russian and Siberian kales are a different species, not true kales, although they are grown in the same way. ‘Redbor’ is a vigorous hybrid with ruffled, deep maroon leaves that can reach four to five feet.
A mix of two or three types gives you different textures in the kitchen. Also, curly kale holds up best in the coldest weather, while Tuscan kale is tender enough to eat raw.
When to Start Growing Kale
Kale is a cool-season crop. Seeds germinate between 40 and 85°F, according to Clemson, so they sprout in soil that is far too cold for most summer crops. Consequently, you get two planting windows: spring and late summer.
Spring Planting
In spring, UMD advises planting seeds as soon as the soil can be worked, three to four weeks before the last frost date. The goal is to harvest before the summer heat arrives, since hot weather makes the leaves tough and bitter.
For a head start, sow indoors a few weeks earlier, then set the transplants out. If you do, give them a week to adjust to sun and wind first; Hardening Off Plants: How Much Stress Is Enough sets out a schedule.
Fall Planting
Fall is where kale really shines. Plant in mid to late summer, so the plants are well grown by the first frost. Clemson’s planting dates for South Carolina show the idea: in the Piedmont, spring sowing runs from March 12 to June 30, and fall sowing from July 15 to September 30. Farther north, the fall window opens earlier.
To find your own dates, count back from your first frost; First Frost Date: How to Find Yours and Protect Your Crops shows how. For other crops that suit the same season, read Fall Vegetable Gardening Guide: Crops That Thrive in Cooler Weather.
Sun, Soil and Spacing for Growing Kale
Kale needs at least six hours of sun, Clemson says, in soil that is fertile and well drained. It will tolerate a little shade in summer. Still, full sun gives the strongest plants in spring and fall.
Before planting, UMD recommends working compost into the soil. Clemson adds that the pH should sit between 6.0 and 6.5, and that you should adjust fertility according to a soil test. If you have never tested yours, Soil pH Level: Testing and Balancing for Maximum Yield explains the process.
In growing kale, spacing depends on the variety. UMD gives 12 to 24 inches between plants in the row, with 30 to 36 inches between rows for large plants. Crowded kale grows thin and stays damp, which invites disease. Therefore, thin seedlings early, and eat the thinnings as baby greens.
Feeding and Watering Kale
When growing kale, remember that it is a leafy crop, so it needs a steady supply of nitrogen. UMD lists it among the crops with medium nutrient needs. Its advice is to use a starter fertilizer when transplanting, then side-dress three weeks later. After that, a light feed every month or so keeps new leaves coming through the long fall harvest.
Water keeps the leaves tender. A plant that dries out becomes tough and strong-flavoured, so aim for even moisture. Similarly, a layer of mulch around the plants holds water in the soil and keeps the roots cool in late summer; Organic Garden Mulch: How Deep to Lay It and When to Wait covers the details.
Finally, do not plant kale where cabbage, broccoli or other brassicas grew last year. The same pests and diseases wait in the soil. Vegetable Crop Rotation: An Essential Guide for Soil Health Families explains how to plan the move.
How to Harvest Kale
Harvesting is where growing kale earns its reputation. You can pick immature leaves after about 30 days, according to Clemson, or mature leaves between 50 and 70 days.
The standard method is cropping. As Clemson puts it, you remove the outermost leaves, and the older, lower leaves are harvested continuously while the new growth is left alone. Here is how to do it:
- Start at the bottom. Pick the largest, oldest leaves near the base of the stem.
- Snap or cut cleanly. Pull each leaf down and away from the stem, or cut it with a knife.
- Leave the top. Always keep the central bud and the young leaves around it.
- Repeat weekly. Take a few leaves from each plant every week or so.
Over the season, the stem grows taller and the plant starts to look like a small palm tree. That is normal. Alternatively, UMD describes a cut-and-come-again approach for baby greens: shear young plants down to the crown with sharp scissors when they are 6 to 10 inches tall. For more crops that regrow this way, read Cut and Come Again Gardening: Which Crops Regrow and How to Cut Them.
Clemson notes that greens are best eaten within a week of harvest. Meanwhile, keep them in a plastic bag in the refrigerator.
Growing Kale Through Frost and Winter
Cold is kale’s secret weapon. Clemson states that kale can withstand frost, and that colder temperatures sweeten the leaves. During cold nights, the plant converts some of its starch into sugar, which works as a natural antifreeze and softens the bitter edge.
How much cold can it take? UMD says kale tolerates 15 to 20°F and is more cold-tolerant than collards. Clemson puts the leaves at hardy to 20°F. Below that, the leaves may be damaged, although the stem often survives and regrows.
To stretch the harvest further, cover the plants on the coldest nights. A floating row cover adds a few degrees of protection, and a cold frame adds more; Cold Frame Gardening: Build a Box That Feeds You Through Winter shows how to build one.
Kale Pests and Diseases
Kale shares its pests with the rest of the cabbage family. Clemson lists caterpillars, flea beetles, leaf beetles and aphids as the main insects. UMD names the cabbage looper, the harlequin bug and the imported cabbageworm.
Caterpillars
The green caterpillars of the cabbage white butterfly and the cabbage looper chew holes in the leaves. Check the undersides of the leaves often and pick them off. However, the best defence is to stop the butterflies from laying eggs at all. UMD recommends floating row cover for protection from both weather and pests, and Floating Row Covers: Protecting Brassicas from Pests and Frost explains how to lay it.
Aphids and Flea Beetles
Gray cabbage aphids cluster in tight colonies, often in the growing tip. A strong spray of water knocks them off, and ladybugs soon follow. For a measured response, read Aphid Control Methods: When to Spray and When to Wait. Flea beetles, meanwhile, pepper young leaves with tiny holes. They matter most on seedlings, so a row cover in spring is again the answer.
Diseases
Clemson names Alternaria and Cercospora leaf spots, bacterial blight, black rot, and crown and root rots as the main diseases. Most of them spread in wet, crowded conditions. So give the plants room, water at the base, remove spotted leaves, and rotate the bed every year.
Growing Kale All Year
With two plantings, one in early spring and one in late summer, kale can supply your kitchen for most of the year. It asks for little: cool weather, rich soil and a gardener who picks the lower leaves. In return, it gives salads, soups, stir-fries and chips from the same few plants. So when you plan next season, put growing kale at the top of the list.
Check out the author’s book here: The Year-Round Vegetable Garden for Beginners.


Leave a Reply