
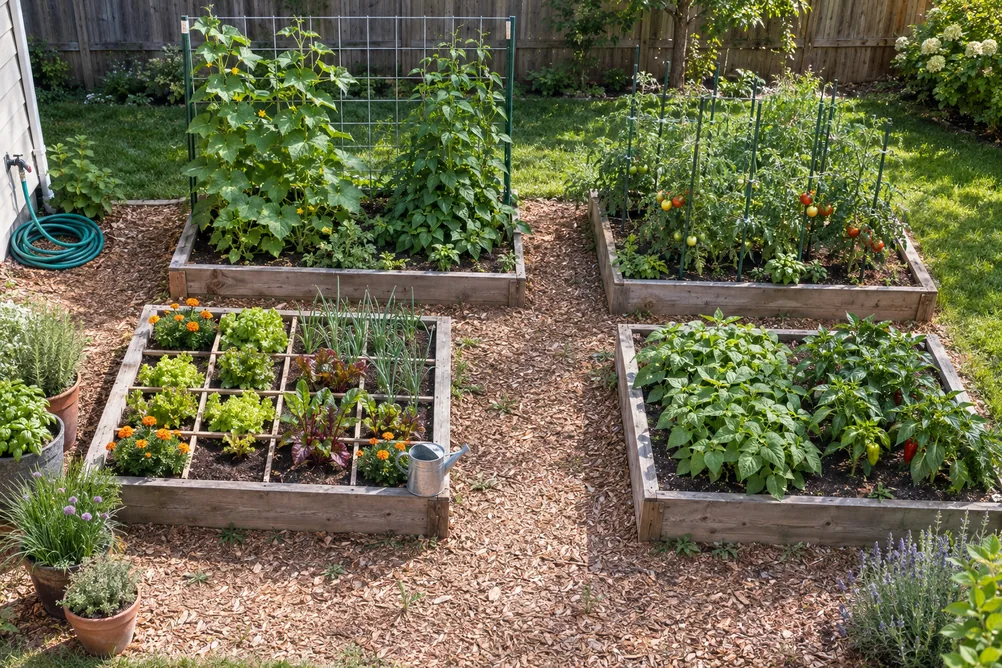
Most first gardens fail on paper long before they fail in the soil. The beds end up in the shade of a fence, the hose does not reach the far corner, and the tomatoes grow so tall that the lettuce behind them never sees the sun. None of this takes special skill to avoid. It only takes a little planning before you dig. This guide walks you through a simple vegetable garden layout, from choosing the site to arranging the plants inside each bed, using advice from university extension services.
Why a Vegetable Garden Layout Matters
A good plan saves you work all season long. When the beds sit in full sun, close to water and easy to reach, you spend your time growing food instead of fighting the site. In addition, a clear layout makes it easier to rotate crops, add succession plantings and keep the paths free of weeds.
Planning also protects your budget. Lumber, soil and compost cost money, so it is worth knowing where each bed goes before you buy anything. If you are brand new to growing food, our guide to starting a vegetable garden covers the first steps in more detail.
Start With the Site
The best layout in the world cannot fix a bad location. Before you draw a single bed, look at three things: sun, water and the ground itself.
Sun Comes First
Vegetables need light to produce. According to the University of Maryland Extension, a vegetable garden needs at least six hours of full sun a day. Fruiting crops such as tomatoes, peppers and squash want even more, while leafy greens can manage with a little less.
Watch your yard for a full day before you decide. Note where the shadows of the house, trees and fences fall in the morning, at noon and in the late afternoon. Our guide to making a garden sun map shows you how to record this in a simple sketch. Remember, too, that trees leaf out in spring, so a spot that looks sunny in March may be shaded by June.
Water, Access and Level Ground
UMD also recommends a site you can reach with a hose from an outdoor spigot. Carrying cans across the yard gets old quickly, and plants that wait for water produce less. If you plan to install drip lines later, a short run from the faucet makes that job much easier as well. Our guide to drip tape installation explains how a simple system works.
Level ground is the other thing to look for. On a slope, water runs off before it soaks in, and soil washes downhill after heavy rain. If flat ground is not available, run the beds across the slope rather than up and down it. Finally, place the garden where you pass by every day, because a garden you see often is a garden you tend often.
How Big Should Your First Garden Be?
Start smaller than you think. UMD suggests a first garden of only 25 to 50 square feet, which is about one or two raised beds. That may sound modest, but a small, well-kept plot produces more than a large one full of weeds. Once you know how much time the garden really takes, you can add beds the following year.
Sketch Your Vegetable Garden Layout on Paper
UMD advises drawing a map of the garden before you build any beds. Graph paper works well, with one square equal to one foot. Mark north, the water source, trees, fences and any slopes. Then draw the beds and paths to scale, and list which crops will go where.
This step takes an evening, yet it answers most of the hard questions early. For example, you can see at once whether the paths are wide enough for a wheelbarrow. Keep the sketch after the season ends, too, because it becomes the record you need for rotating crops next year.
Which Way Should Rows Run?
Orientation matters most for tall crops. Oregon State University Extension recommends running rows north to south, with the tallest crops at the north end. That way, the sun travels across the rows during the day, and the tall plants do not shade the short ones. With east-west rows, by contrast, tall crops cast shade on everything to the north of them.
OSU also notes that the effect is strongest in winter, when the sun sits low, and that a garden can still succeed either way. So if your yard only allows east-west beds, simply put the tall crops on the north side of each bed. UMD gives the same advice: plant tall crops such as corn, pole beans and trellised cucumbers along the north and west edges of the garden.
Paths You Can Actually Use
Paths are part of the plan, not leftover space. Every bed should be easy to reach from a path, so you never need to step on the growing soil. Colorado State University Extension recommends paths about 18 to 24 inches wide between raised beds. Cover them with straw or wood chips to keep weeds down and your shoes clean. Our guide to organic garden mulch compares the materials that work best.
If you need to bring a wheelbarrow or a garden cart through, make at least one main path a little wider. It is much easier to plan that now than to move a bed later.
Six Vegetable Garden Layout Ideas for Beginners
There is no single right vegetable garden layout for every yard. The best choice depends on your space, your soil and how much building you want to do. Here are six common layouts, from the simplest to the most compact.
Traditional Rows
Long single rows with a walkway between each one are the classic farm layout. They are easy to plant with a hoe and simple to weed with a tiller. However, much of the space goes to paths, and walking between the rows packs down the soil. For a large, open plot with good ground, rows still work well. In a backyard, though, most gardeners get more from beds.
Block-Style Vegetable Garden Layout in Raised Beds
In a block layout, you plant in wide beds and never walk on them. Colorado State University Extension describes block-style layouts in raised beds that are 3 to 4 feet wide and as long as you like. That width lets you reach the center from either side. Short rows then run across the bed instead of along it.
The advantage is yield. CSU reports that this style can produce up to five times more than traditional rows, because far less ground goes to walkways. The soil also stays loose, since no one steps on it. For a good start, fill new beds with the right blend, as our guide to raised bed soil mix explains.
Square Foot Gardening
Square foot gardening is a tighter version of the block layout. You divide each bed into squares of 12 by 12 inches, using string or thin wooden slats. Each square then holds one crop, planted at a set number per square. According to CSU, lettuce, carrots, peppers, onions and herbs all suit this method well.
The grid makes planning very easy for beginners. You can see at a glance how many plants fit, and you replant one square at a time after each harvest. On the other hand, large sprawling crops such as squash and melons do not fit neatly into single squares.
Containers on a Patio
If you have no open ground at all, containers are the answer. A patio, balcony or driveway can hold large pots, grow bags and half barrels. Bigger containers dry out more slowly, so choose the largest ones you can manage. Group them close to the door and the faucet, and use a proper potting mix rather than garden soil. Our guide to the best soil for container vegetables explains what to buy.
Vertical Growing on Trellises
Growing up instead of out saves a surprising amount of space. Cucumbers, pole beans, peas and small melons all climb happily on a sturdy support. Place trellises on the north side of the garden, as UMD and OSU recommend, so they do not shade the lower crops. Our guides to vegetable trellis designs and the vertical vegetable garden show which structures work best.
A Keyhole Bed
A keyhole bed is a round raised bed with a narrow notch cut into one side. The notch lets you reach the whole bed from a single spot, and a compost basket in the center feeds the soil as it breaks down. This design works well in dry climates and in small yards. Our guide to the keyhole garden explains how to build one step by step.
Planting Inside Each Bed
Once the beds of your vegetable garden layout are in place, the next question is how to arrange the plants within them. A few simple habits help every bed produce more.
Equal Spacing Instead of Rows
In a block layout, CSU recommends equidistant spacing, which means each plant sits the same distance from all its neighbors. That pattern fills the bed evenly, and the leaves shade the soil as they grow, which keeps weeds down. As a guide, CSU suggests 2 to 3 inches between carrots, 4 to 6 inches between beets and 7 to 9 inches between leaf lettuce plants.
Larger crops need more room. For example, CSU fits about three pepper plants across a 4-foot bed, while tomatoes need 24 to 36 inches each. For more ideas on filling beds closely without crowding, see our guide to intensive gardening.
Companions and Succession Crops
Good neighbors make a bed more productive. Tall tomatoes can shade lettuce in midsummer, for instance, while basil and marigolds fill the gaps at their feet. Our vegetable companion planting chart lists the pairs that work well together.
Also leave room in the plan for a second crop. When early peas or radishes finish, a bed can hold beans or fall greens for the rest of the season. Our guide to succession planting shows how to time these changes.
Rotation Built Into Your Vegetable Garden Layout
Beds of equal size make crop rotation simple. Group your crops into families, such as tomatoes and peppers, cabbages and kale, beans and peas, and roots and onions. Then move each group to the next bed every year. That habit helps prevent soil diseases and pests from building up in one spot. Our guide to vegetable crop rotation explains the plant families in more detail.
A Sample Vegetable Garden Layout for Four Beds
Here is a simple plan for four raised beds, each 4 by 8 feet, with wood-chip paths between them. It is a good goal for a second or third season, after you have learned the basics on one or two beds.
- Bed 1, north side: a trellis along the north edge with pole beans and cucumbers, plus bush beans in front.
- Bed 2: tomatoes staked in the center, with basil and marigolds around them.
- Bed 3: a square foot grid with lettuce, beets, onions, carrots and herbs, replanted square by square.
- Bed 4: peppers, eggplant and a row of bush squash at the sunny south end.
A few large containers of herbs at the corners of the paths add flavor close to the kitchen. The next year, each group simply moves one bed along. If you prefer a different mix of crops, our guide to the best raised bed crops can help you choose.
Frequently Asked Questions
What is the best vegetable garden layout for beginners?
For most beginners, one or two raised beds in a block or square foot layout work best. They are easy to reach, easy to weed and simple to rotate each year.
How far apart should raised beds be?
Colorado State University Extension suggests paths of about 18 to 24 inches between beds. Make one main path wider if you plan to use a wheelbarrow.
Can you plan a garden in partial shade?
Yes, but choose crops carefully. Lettuce, spinach, kale, peas and herbs cope with four to six hours of sun, while tomatoes, peppers and squash need full sun.
Growing Into Your Vegetable Garden Layout
The best vegetable garden layout is one you can look after without strain. Start with a sunny, level site close to water. Then sketch the beds on paper, keep tall crops on the north side, and leave comfortable paths between the beds. Plant evenly inside each bed, pair good companions, and rotate the crop families every year. As your confidence grows, you can add beds and new ideas. When you are ready to decide what goes in when, Seed Starting Calendar: How to Plan Your Vegetable Gardening Year turns the layout into a planting schedule.
Check out the author’s book here: The Year-Round Vegetable Garden for Beginners.
Leave a Reply