
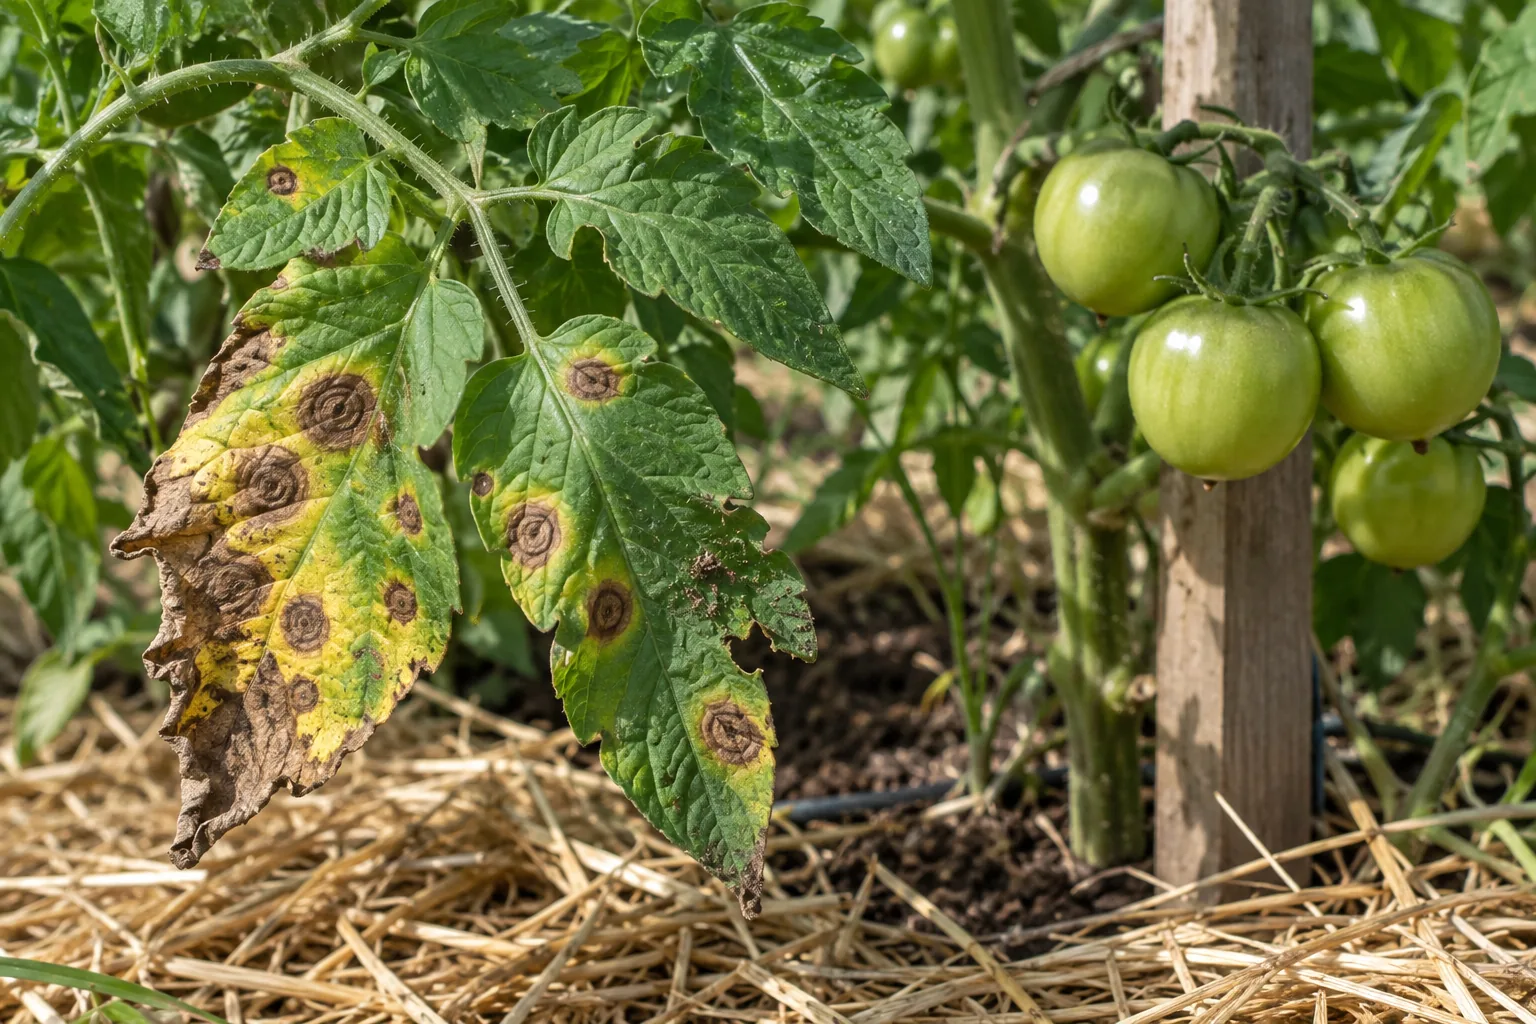
Every summer, the same thing happens in many tomato beds. The plants look strong in June. Then, one morning, the lowest leaves have brown spots. A week later those leaves are yellow, and the spots have moved up the stem. That slow climb from the bottom is the signature of Early Blight, the most common leaf disease of garden tomatoes in wet, warm regions.
The good news is that you can spot it early and slow it down. You can also make next year’s crop much less likely to catch it. In this guide, you will learn how to identify the disease, why it starts where it does, and which habits keep it in check. The advice draws on three extension services: University of Maryland Extension, UConn Integrated Pest Management and UC IPM, the University of California pest management program.
What Is Early Blight?
Early blight is a fungal disease. Maryland Extension names the cause as Alternaria linariae, formerly called Alternaria solani, and many older guides still use the old name. The fungus attacks tomatoes and potatoes, and it also lives on related weeds such as nightshade.
Despite the name, the disease is not always early. It often shows up in midsummer, once plants carry a heavy load of fruit. What makes it “early” is its habit of starting on the oldest leaves, near the soil, long before the rest of the plant is touched.
It is also a different disease from late blight. Late blight is caused by a water mold, spreads in cool, wet weather and can kill a plant in days. By contrast, early blight works slowly, from the bottom up, over weeks.
How to Identify Early Blight
The symptoms are distinctive once you know them. Look at the leaves closest to the ground first.
Leaf Spots with Rings
Maryland describes small brown spots on older leaves that quickly grow larger. A yellow halo usually surrounds each spot. With a hand lens, you can see a bullseye pattern of concentric rings inside the lesion, like the rings of a target.
UC IPM gives a useful size: the spots are usually about 0.25 to 0.5 inch across, and they feel leathery. As they multiply, they merge. Eventually the whole leaf turns yellow, then brown, and drops.
Stem Lesions
The fungus also attacks stems. UConn describes dark, sunken lesions that are longer and narrower than the spots on leaves. On young transplants, a lesion near the soil line can girdle the stem, a problem known as collar rot.
Fruit Spots
Fruit can be hit too. UC IPM notes that fruit spots are sunken and dry, may show the same concentric rings, and frequently form near the calyx end, where the fruit joins the stem. In addition, Maryland points out that dead foliage may stick to the fruit.
What Early Blight Is Not
Several problems can be confused with it. Septoria leaf spot also starts low, but its spots are much smaller and have no rings. Blossom-end rot causes dark patches on the bottom of the fruit, not the top, and it is not a disease at all; Identifying and Preventing Blossom-End Rot in Your Vegetable Crop explains that calcium problem. Likewise, stripped leaves with no spots at all point to a caterpillar, as described in Tomato Hornworm Control: Organic Ways to Stop the Green Monster.
Why Early Blight Starts at the Bottom
The pattern of the disease follows the path of the spores.
Maryland explains that the fungus overwinters in soil and on plant debris. In spring, rain and irrigation splash spores from the soil onto the lowest leaves. So those leaves get infected first. From there, new spores form on the lesions and move upward, carried by wind, more splashing water, insects and animals, as UConn lists.
Weather does the rest. UConn reports that infection increases in warm, humid weather with heavy dew or rain, between 59 and 80°F, with the best conditions for the fungus at 82 to 86°F. The spores need a wet leaf to germinate. According to UConn, it can take about one week for symptoms to appear under favorable conditions.
That wet-leaf rule is the key to control. UC IPM notes that the disease halts in hot, dry weather, and that it mainly affects tomatoes exposed to rain. In short, every hour your leaves stay wet is an hour the fungus can work.
How to Slow Early Blight Once You See It
You cannot cure an infected leaf. However, you can slow the disease enough that the plant keeps producing until the end of the season.
- Remove spotted leaves. Cut off the lowest infected leaves as soon as you see them. Work on a dry day, because wet foliage spreads spores on your hands and tools.
- Clear the lower stem. Maryland recommends removing the lowest three or four leaf branches once the plant starts setting fruit. This lifts the canopy off the soil and ends the splash route.
- Bag the debris. Do not leave infected leaves on the ground. Put them in the trash, or compost them only if your pile runs hot.
- Stop wetting the foliage. Water the base of the plant, not the leaves.
- Improve the air. Open up crowded plants so the leaves dry quickly after dew.
Pruning for airflow matters so much that it deserves its own method. Pruning Indeterminate Tomatoes: Maximizing Yields and Airflow shows how to thin a vine without losing fruit.
Fungicides for Early Blight
Sprays are an option, but they protect healthy leaves rather than cure sick ones.
UConn lists protectant fungicides such as chlorothalonil, mancozeb and copper-based products, applied on a 7 to 10 day schedule. For organic gardens, Maryland mentions fixed copper, and UC IPM also includes Bacillus subtilis, a biological product. All three sources agree on timing: start when conditions favor the disease and symptoms first appear. A spray applied after half the plant is brown will not bring it back.
If you do spray, read the label every time. It tells you the interval between applications and how long to wait before harvest. Cover both sides of the leaves, and reapply after heavy rain.
For many home gardens, though, sprays are not needed at all. Good spacing, mulch and dry leaves do most of the work.
How to Prevent Early Blight Next Year
Prevention starts before planting. Here are the habits the extension services recommend.
Rotate Your Crops
Because the fungus survives on old plant debris, planting tomatoes in the same spot every year keeps it well fed. UC IPM advises rotating so that infected debris has time to decompose before tomatoes return. Remember that potatoes, peppers and eggplant belong to the same family, so they do not count as a break. Vegetable Crop Rotation: An Essential Guide for Soil Health Families explains how to plan the cycle.
Mulch the Soil
Maryland recommends heavy mulching to reduce soil splash. A layer of straw or shredded leaves forms a barrier, so rain lands on mulch instead of bare soil and cannot throw spores up. For depth and timing, see Organic Garden Mulch: How Deep to Lay It and When to Wait.
Water at the Base
Drip lines and soaker hoses keep foliage dry. If you use a hose, water in the morning, so any stray drops dry quickly. Efficient Watering Techniques for Sustainable Vegetable Gardening compares the options.
Stake and Space Your Plants
A tomato that sprawls on the ground has its leaves in the splash zone all summer. Instead, lift it onto a stake, cage or trellis, and leave room between plants for air to move. Maryland also suggests removing the basal suckers, the shoots at the foot of the plant. For support ideas, read Vegetable Trellis: Five Designs, What They Cost, and Which Crop Goes on Each.
Choose Resistant Varieties
Breeding has made real progress here. UConn lists a range of varieties with early blight resistance, including Mountain Magic, Mountain Merit, Iron Lady and Defiant. Resistant does not mean immune; these plants still get spots, but the disease moves more slowly. Growth habit matters too, since compact plants dry out faster; Determinate vs Indeterminate Tomatoes: Choosing the Right Variety explains the difference.
Start with Clean Seed and Transplants
The fungus can travel on seed and on transplants, as Maryland points out. So inspect seedlings before you buy them, and reject any with spotted leaves or dark marks on the stem. UConn mentions hot water seed treatment as a way to clean seed. If you save your own seed, collect it only from healthy plants; Saving Vegetable Seeds: A Step-by-Step Guide for the Home Garden covers the process.
Control Weeds and Volunteers
UC IPM notes that the fungus also survives on nightshade weeds. It recommends removing them, along with volunteer tomato and potato plants that sprout from last year’s crop. These plants can carry the disease through the gap between seasons.
Early Blight and the End-of-Season Cleanup
Fall is when next year’s problem is decided. Once the harvest is over, pull the plants and remove fallen leaves and fruit from the bed.
What you do with the debris matters. Maryland says diseased plant parts can be shredded and composted only with hot composting, where the pile temperature exceeds 120°F and the pile is turned two to three times. A cool, slow heap will not kill the fungus, so if your pile does not heat up, bin the debris. Composting 101: A Beginner’s Guide to Black Gold explains how to build a pile that runs hot.
Finally, cover the bare soil for winter with mulch or a cover crop. Less exposed soil in spring means less splash when the first tomatoes go in.
Can You Eat Tomatoes from a Plant with Early Blight?
Yes. The disease damages leaves, stems and the fruit surface, but it does not make healthy fruit unsafe. Pick sound fruit as usual, and cut away any sunken spots near the stem end. Discard fruit with large lesions, because they will rot in storage.
Heavily defoliated plants do bring a second problem, though: sunscald. Without leaf cover, fruit exposed to strong sun can develop pale, papery patches. So remove only the leaves you must, and keep the upper canopy intact.
Living with Early Blight
In a humid summer, early blight is hard to avoid entirely. Still, it rarely has to ruin a crop. Mulch the soil, water at the base, give the plants air, and pick off the first spotted leaves. Rotate the bed, clean up in fall, and choose a resistant variety next spring. Stack those habits, and the disease becomes a small nuisance at the bottom of the plant rather than the end of your season.
Check out the author’s book here: The Year-Round Vegetable Garden for Beginners


Leave a Reply