
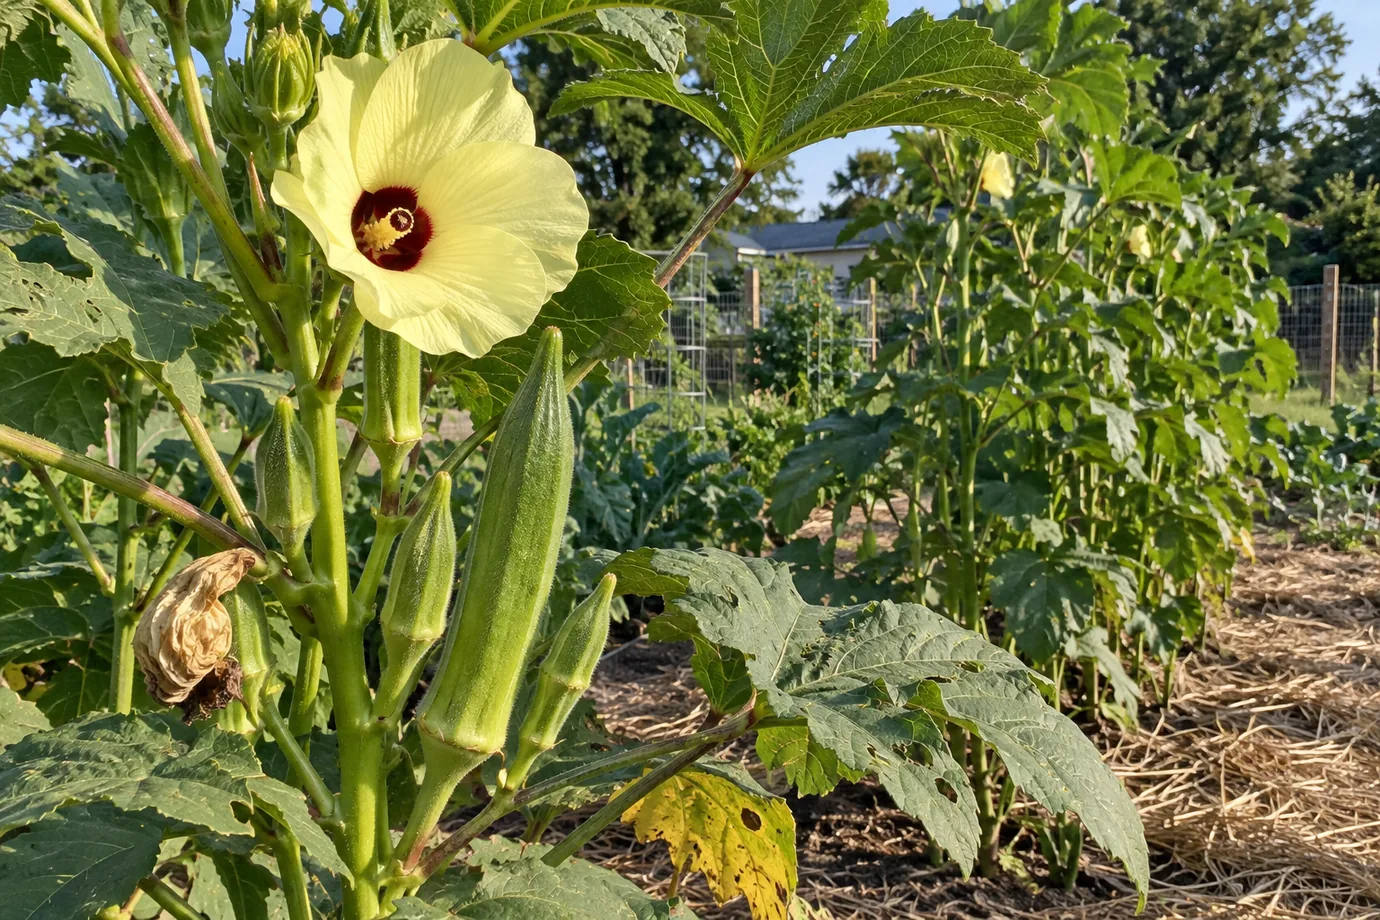
When July heat stops lettuce and peas in their tracks, okra is just getting started. It thrives in the weather that wilts most vegetables, grows taller than the gardener, and sets a new pod almost every day. The catch is that those pods turn woody in a matter of days. Growing Okra well comes down to two things: planting into warm soil, and picking more often than you think you need to.
This guide covers okra from seed to harvest. The advice comes from University of Maryland Extension, the Clemson Home and Garden Information Center and University of Illinois Extension.
Why Growing Okra Is Worth It
Okra is a member of the mallow family, a relative of hibiscus and cotton. You can see it in the flowers, which are large, pale yellow and dark red at the centre. Each one lasts only a day, and the pod forms right behind it.
The plant is also tough. UMD describes okra as somewhat drought-hardy, and it keeps producing through heat that makes tomatoes drop their blossoms. In fact, our guide to Drought Tolerant Gardening: Water-Saving Techniques for Home lists it among the deep-rooted crops that cope best with dry spells. Moreover, UMD puts the yield at 10 to 15 pounds per 10-foot row, which is a lot of food from a narrow strip of ground.
Choosing an Okra Variety
Standard okra plants can grow well over head height. So for a small garden, a compact type makes life easier. University of Illinois recommends dwarf, branching varieties such as ‘Annie Oakley’, which grow only 2½ to 5 feet tall and keep the pods within reach.
Clemson lists several varieties that do well in the South:
- ‘Clemson Spineless 80’. The classic green okra, with fewer of the prickly hairs that make picking uncomfortable.
- ‘Lee’. A compact plant with straight, spineless pods.
- ‘Annie Oakley II’. A dwarf hybrid, early and productive.
- ‘Cajun Delight’. A reliable, early green variety.
- ‘Burgundy’. A red variety whose pods turn green when cooked.
Red okra is also ornamental, so it earns a place near the front of the bed. If you want to keep your own seed from year to year, choose an open-pollinated variety; Saving Vegetable Seeds: A Step-by-Step Guide for the Home Garden explains how.
When to Start Growing Okra
Okra is a true warm-season crop, and cold soil is its biggest enemy. According to UMD, you should sow the seed when the soil has warmed to 65°F, usually 2 to 3 weeks after the last frost. Clemson gives the same minimum, measured at a 4-inch depth, and notes that okra germinates best between 70 and 95°F.
Seed sown too early simply sits and rots. Clemson also warns that root-decay diseases are worse in cold, wet soil. So a soil thermometer is worth more than the calendar here; Soil Temperature for Planting: When to Safely Sow Warm-Season Crops shows how to take a reading.
In South Carolina, Clemson’s planting window runs from May 1 to June 30 on the Coastal Plain and from May 15 to July 15 in the Piedmont. Farther north, the season is shorter, so sow as soon as the soil is warm enough.
Starting Okra Indoors
In short-season areas, a head start helps. UMD suggests starting seeds indoors 5 to 6 weeks before all danger of frost has passed. Sow in individual pots, because okra has a long taproot and dislikes having its roots disturbed. Then plant out without breaking the root ball. To compare the two methods, read Direct Sow vs Transplant: Which Method is Better for Your Vegetable Garden?
Soaking Okra Seed
Okra seed has a hard coat. UMD suggests scratching it with sandpaper or a wood rasp, or soaking it in water for 12 to 24 hours before planting. Similarly, University of Illinois notes that seeds may be soaked overnight, or wrapped in moist paper towels, to speed germination. Clemson, however, says soaking may help but is not essential. In warm soil, dry seed comes up well enough.
Sun, Soil and Spacing for Growing Okra
Okra needs full sun. In shade it grows thin and sets few pods. Clemson also notes that pod rot is less of a problem in full sun with good spacing.
The ideal soil, according to Clemson, is a well-drained sandy loam, although okra grows on all soil types. Aim for a pH between 5.8 and 6.5. If you have not checked yours recently, Soil pH Testing: How to Take a Sample That Means Something explains how to take a useful sample.
Next, give the plants room. UMD recommends 12 to 18 inches between plants and 36 to 48 inches between rows. University of Illinois suggests sowing seeds 1 inch deep in hills 12 to 24 inches apart, then thinning to one plant per hill when the seedlings reach 3 inches tall. Snip the extras at soil level rather than pulling them, so you do not disturb the roots of the keeper.
Feeding Okra
When growing okra, remember that it is a hungry plant; UMD describes its nutrient requirement as high. Still, the timing of the feeding matters. Clemson warns against too much nitrogen early on, because it pushes leaves at the expense of pods.
Clemson’s plan is simple:
- Before planting. Work in 25 to 50 pounds of 10-10-10 fertilizer per 1,000 square feet, or follow a soil test.
- First side-dressing. At 3 to 4 weeks, apply 3 to 6 pounds of calcium nitrate per 1,000 square feet.
- Second side-dressing. Repeat at 6 to 8 weeks.
UMD gives a similar rule for home gardeners: side-dress at least once after the pods begin to form. If you prefer organic feeds, compost and well-rotted manure worked in before sowing provide a steady base.
Watering and Mulching Okra
Okra tolerates drought, but it does not produce well under stress. Clemson notes that the critical period is pod set and pod development. During that time, water deeply enough to moisten the soil to a depth of 6 inches.
Water in the morning, Clemson advises, so the foliage dries before dark. A drip line or soaker hose keeps the leaves dry altogether; Drip Tape Installation: DIY Micro-Irrigation for Efficient Veggie Gardens shows a simple setup.
Once the soil is warm, add a 2- to 3-inch layer of organic mulch. It holds moisture and keeps down weeds. But do not lay it too early, since mulch keeps cold soil cold; Organic Garden Mulch: How Deep to Lay It and When to Wait covers the timing.
Growing Okra Taller or Bushier
Left alone, okra grows one tall main stem. However, UMD suggests pinching off the growing points when the plants reach about 24 inches, to increase yields. The plant then branches, and each branch carries pods. As a result, you get more pods at a height you can reach.
In very hot summers, even tough okra can suffer. Shade cloth is rarely needed. Still, Protecting Plants from Extreme Heat: Preparing Your Garden for Summer Waves explains how to help the whole bed through a heat wave.
How to Harvest Okra
Harvest is where growing okra is won or lost. The first pods usually come 50 to 60 days from transplanting, according to UMD, or 60 to 70 days after seeding, according to Clemson.
The key is size. UMD recommends picking pods 2 to 4 inches long, one to three days after the flowers open. University of Illinois prefers them at 2 to 3 inches, and ideally about 2. Clemson notes that larger pods become tougher and more fibrous. In other words, a pod that looks perfect on Monday may be woody by Thursday.
Here is how to keep up:
- Pick often. UMD suggests three times a week, and Clemson says at least every two days.
- Wear gloves. Many varieties have fine, prickly hairs on the leaves and pods. UMD advises gloves and clippers or a knife.
- Cut, do not pull. Snip the stem just above the cap, so you do not tear the branch.
- Remove overgrown pods. Even a pod you missed should come off. Otherwise, the plant puts its energy into seed and slows down.
Picked this way, okra keeps producing for a long time. Clemson says a harvest can last up to twelve weeks when the plants are properly watered, fertilized and picked promptly.
Ratooning: A Second Crop from the Same Plants
By midsummer, tall okra often slows down. Clemson describes a technique called ratooning to renew it. Between mid-July and mid-August, when production drops, mow or prune the plants to 6 to 12 inches above the soil line.
Then feed them with a fertilizer that has twice as much potassium as nitrogen, such as 5-0-10, at 2 to 3 pounds per 100 feet of row. The stumps send out new shoots, and production resumes in 4 to 6 weeks. This works best in long, hot seasons, where there is time for a second flush before the first frost.
Pests and Diseases When Growing Okra
Okra has fewer problems than many vegetables. Still, a few are worth knowing.
Insect Pests
Clemson lists aphids, corn earworms, stink bugs and leaffooted bugs as the main insects. Stink bugs are the most damaging, because their feeding causes the pods to be twisted and distorted. University of Illinois also names Japanese beetles, brown marmorated stink bugs and cabbage worms.
Aphids gather on the undersides of leaves and on young pods. Often, lady beetles clean them up without help; Aphid Control Methods: When to Spray and When to Wait explains when to step in. For stink bugs, hand-pick them early in the morning, when they move slowly.
Diseases and Nematodes
UMD notes that powdery mildew can be a problem late in the season. Good spacing and full sun help, and Powdery Mildew Treatment: Buying Weeks, Not Winning the War explains what treatment can and cannot do.
Root-knot nematodes are a bigger concern in sandy southern soils. Clemson suggests inspecting stunted or yellow plants for galls on the roots. If you find them, grow okra in a different bed next year. Vegetable Crop Rotation: An Essential Guide for Soil Health Families helps you plan the move.
Storing Fresh Okra
Okra does not keep long. UMD recommends storing it unwashed in a paper bag in the refrigerator drawer, and warns that the pods become pitted if stored for more than a week. Clemson sets the ideal range at 45 to 50°F, with some humidity. University of Illinois is stricter still, advising two to three days in the crisper, loosely wrapped in perforated plastic.
So the best plan is to cook okra soon after picking. For longer storage, small pods can be blanched and frozen.
Make Growing Okra Part of Your Summer
Once the soil is warm, okra asks for little: sun, room, a couple of feedings and a gardener who checks it every other day. In return, it produces through the hottest weeks of the year, long after spring crops have given up. So next spring, when the soil reaches 65°F, try growing okra in a sunny corner, and keep your gloves by the door.
Check out the author’s book here: The Year-Round Vegetable Garden for Beginners.


Leave a Reply