
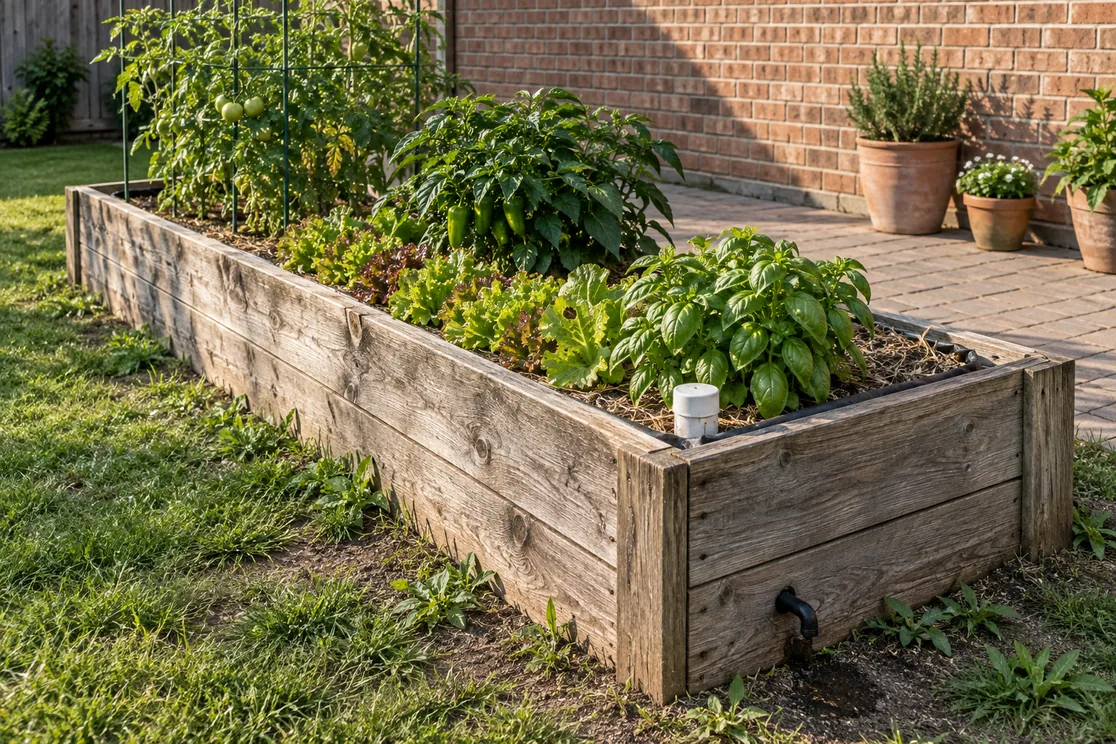
Most raised beds have one weak point: they dry out fast. In July, a bed that looked fine at breakfast can be wilting by dinner. A Wicking Bed solves that problem from below. It is a raised bed with a sealed water reservoir hidden in its base. Plants draw water up from that reservoir as they need it, so you fill a pipe once every few days instead of standing there with a hose every evening.
University of Kentucky Extension describes the raised wicking bed as a self-contained way of growing vegetables, fruits, herbs and flowers, with a built-in reservoir that lets plants water themselves. In this guide, you will learn how the system works, what you need to build one, how to fill it and how to run it through a full season.
How a Wicking Bed Works
The secret is capillary action. Water clings to the tiny gaps between soil particles, and that pull lets it climb against gravity. The smaller the particles, the better the lift. According to the Kentucky publication, capillary action can move water up approximately 4 inches above the water level in the reservoir.
So a wicking bed has two zones. At the bottom sits a layer of water held by a waterproof liner. Above it sits the growing mix. The lowest few inches of mix stay moist all the time, and roots grow down toward that moisture. Once the plants are established, they stay connected to the reservoir and take what they need.
Meanwhile, the top of the soil stays drier than in a bed watered from above. That detail matters more than it seems. Kentucky notes that a drier surface reduces weed competition, evaporation and foliar disease. In other words, less water is lost to the air, fewer weed seeds sprout, and leaves stay dry.
Why Build a Wicking Bed
The main benefit is control. You decide how much water is stored, and the plants decide when to use it. Here are the advantages the Kentucky Extension lists:
- Steady moisture. Plants have a constant supply, so they are less likely to suffer drought stress between waterings.
- Less waste. Watering from the bottom reduces evaporation from the surface and runoff.
- Rain capture. The reservoir holds water from rainfall and reduces nutrient loss.
- Longer gaps between waterings. A large reservoir lets busy gardeners stretch their schedule.
- An earlier start. Like any raised bed, it warms sooner in spring than ground-level soil.
- Fewer rabbits. Beds taller than 16 inches discourage them.
If water is your limiting factor, a wicking bed fits well alongside the other methods in Drought Tolerant Gardening: Water-Saving Techniques for Home.
The Drawbacks of a Wicking Bed
However, the design is not free of problems, and the same Kentucky publication is honest about them.
First, a wicking bed costs more than an ordinary bed. The liner and pipe add up. Kentucky’s materials list for a 3 by 10 foot bed came to about $420 at 2020 prices, before any soil.
Second, salts can build up. In a normal bed, water flows through and carries excess salts down and away. In a wicking bed, water mostly rises and evaporates, so salts from fertilizer and tap water can accumulate. A practical habit is to water heavily from the top now and then, so the excess drains out through the overflow.
Third, a shared reservoir spreads trouble. Root pathogens such as water molds can move easily through the water to every plant in the bed.
Finally, raised beds freeze sooner in fall, because the ground does not insulate them. They also hold a limited volume of soil and nutrients, so you may need to side-dress with fertilizer during the season.
What You Need to Build a Wicking Bed
Kentucky’s design uses a handful of parts. Each one has a clear job.
- A frame. Wood, plastic, concrete, stone or steel all work. Keep the bed no more than 4 feet wide, so you can reach the middle from either side.
- A pond liner. This makes the reservoir watertight and protects a wooden frame from rot. Butyl rubber or PVC liners resist punctures. Kentucky warns against thin plastic sheeting, which degrades in sunlight.
- Perforated pipe. Standard 4-inch or 6-inch perforated drain pipe laid along the floor creates the reservoir. The pipe holds up the soil above it, while its holes let water flow freely.
The rest is plumbing, and it is simpler than it sounds.
- A fill tube. A solid PVC pipe runs from the reservoir to the surface. It should be at least 1.5 inches wide to fit a hose, and 2 inches makes it easier to see the water level.
- An overflow tube. A half-inch vinyl tube or PVC pipe through the side of the bed lets excess water escape. Without it, the growing mix would become waterlogged.
- Filter fabric. This seals the ends of the pipes so soil does not wash in.
An optional extra is a kitchen composter: a length of 6-inch drain pipe with holes drilled in its sides, buried along one edge. You can drop scraps and earthworms into it, and it doubles as a second way to add water. The idea is close to the central basket described in What is a Keyhole Garden: A Beginner’s Guide to This Efficient Method.
How to Build a Wicking Bed Step by Step
Pick a spot with six to eight hours of direct sun, and close to a water source. Then work through these steps.
1. Level the Ground
Remove grass and topsoil to make a flat, level base. A reservoir only works if the water sits evenly. On a slope, one end floods while the other stays dry. Also avoid placing the bed where it would block natural drainage.
2. Assemble the Frame
Build the frame and stake it firmly. Kentucky’s example uses 2×10 boards and a total height of about 19 inches. Leave aisles of 2 to 4 feet between beds for wheelbarrows and hose reels.
3. Fit the Liner
Clear anything sharp from the floor and sides first. Then drape the liner over the bed, smooth out the wrinkles and fold the corners neatly. Adding a little water helps the liner settle into the edges. For extra protection, lay woven geotextile fabric or thick cardboard underneath.
4. Lay the Pipe and Fit the Overflow
Cut the perforated pipe to length and lay it across the floor. Next, drill a hole through the side of the frame for the overflow tube. Place it level with the top of the pipe, because that height sets the maximum water level. Push the tube through a small cross cut in the liner for a snug seal.
5. Install the Fill Tube
Stand the fill tube in one of the pipes, with its top above the finished soil. Keep it at least 12 inches from the overflow; otherwise, you may not be able to judge the water level accurately. Cap it, so mosquitoes cannot breed inside.
Filling a Wicking Bed
The growing mix decides whether the wicking works at all. Kentucky stresses that texture and structure are critical. Peat moss, compost and potting mix are porous and drain well. By contrast, heavy clay soil can keep roots wet too long and invite disease. So, as with any container, avoid plain garden soil; Best Soil for Container Vegetables: Air Space Before Nutrients explains why air space matters so much.
Kentucky’s method is to lay three equal layers above the reservoir: peat moss, then compost, then mostly potting mix on top. For a 3 by 10 foot bed with 1 foot of mix, that means 30 cubic feet in total, or about 10 cubic feet of each material.
Wet the peat moss as you place it. Dry bagged peat repels water, and wetting it lets it settle, cuts dust and stops a perched water table from forming. Then fill the reservoir and water the surface too, so air pockets collapse. Expect the mix to sink, and top it up before planting. For more on blending materials, see Raised Bed Soil Mix: The Perfect Ratio for Growth.
Running a Wicking Bed Through the Season
Once it is built, a wicking bed is simple to run, but a few rules help.
Water from the top at first. Seeds, seedlings and fresh transplants have no roots near the reservoir yet. So water them at the surface until their roots reach the moist zone. A full reservoir at planting time also helps, because it raises moisture higher in the bed.
Refill every few days. As plants grow, they drink more. Kentucky suggests that, without rain, an established bed may need water every four to seven days. Fill slowly through the fill tube until water starts to run from the overflow.
Leave room before rain. Topping up just before a storm wastes water and flushes nutrients out through the overflow. Instead, leave about an inch of space in the reservoir, so the bed can capture the rain.
Use rainwater if you can. Kentucky notes that a rain barrel works as well as city water. Rainwater Harvesting for Vegetable Gardens: What One Barrel Actually Waters shows how far a barrel really goes.
Feed the soil. Because water does not wash through, nutrients stay put, but they still run out. Side-dress during the season, and add earthworms to help break down organic matter.
Close the season well. At the end of the year, the soil level will have dropped. Top-dress with fresh material and sow a cover crop to protect the bed over winter.
What Grows Best in a Wicking Bed
Almost any vegetable will grow in a wicking bed, but thirsty crops gain the most. Tomatoes, peppers, cucumbers, zucchini and eggplant use a lot of water in midsummer, and they suffer when the supply swings between soaked and dry. Leafy greens such as lettuce, chard and spinach also do well, because steady moisture keeps them tender and slows bolting.
On the other hand, crops that like dry feet, such as rosemary, thyme and lavender, are a poor fit. Plant them at the edge, or grow them elsewhere. When choosing crops by depth and spacing, Raised Bed Crops: Choosing by Depth, Spread and Days in the Bed is a helpful companion.
A Smaller Wicking Bed for Patios
You do not need a 10-foot bed to try the idea. Kentucky also publishes a self-watering wicking container built in a muck tub about 16 inches deep. A ring of 4-inch perforated pipe forms the reservoir, a PVC fill tube stands in the ring, and a drain hole about 4 inches above the base sets the water level.
A container like this suits a balcony or a patio where a full bed will not fit. It is also a cheap way to test the method before you build a larger one. If you prefer an even simpler option, Grow Bags for Vegetables: Sizes, Fabric, and What Grows Best in Each covers the lightweight alternative.
Wicking Bed or Other Watering Methods?
A wicking bed is not the only way to save water. Clay pots buried in the soil do a similar job on a smaller scale, as explained in Olla Irrigation System: How to Use Clay Pots for Lazy Watering. Drip lines deliver water slowly at the surface; see Drip Tape Installation: DIY Micro-Irrigation for Efficient Veggie Gardens.
The difference is where the water sits. In a wicking bed, the store is underground and sealed. So it keeps working even when you are away. Add a layer of mulch on top, and surface losses drop further still; Organic Garden Mulch: How Deep to Lay It and When to Wait explains how deep to go.
Build One, Then Watch the Gauge
A wicking bed takes an afternoon or two to build and a little money for the liner and pipe. In return, it gives your plants a steady drink and gives you back your summer evenings. Start with one bed or one tub, keep an eye on the water level, and flush it now and then. By the end of the first season, you will know whether your garden needs more.
Check out the author’s book here: The Year-Round Vegetable Garden for Beginners.


Leave a Reply