
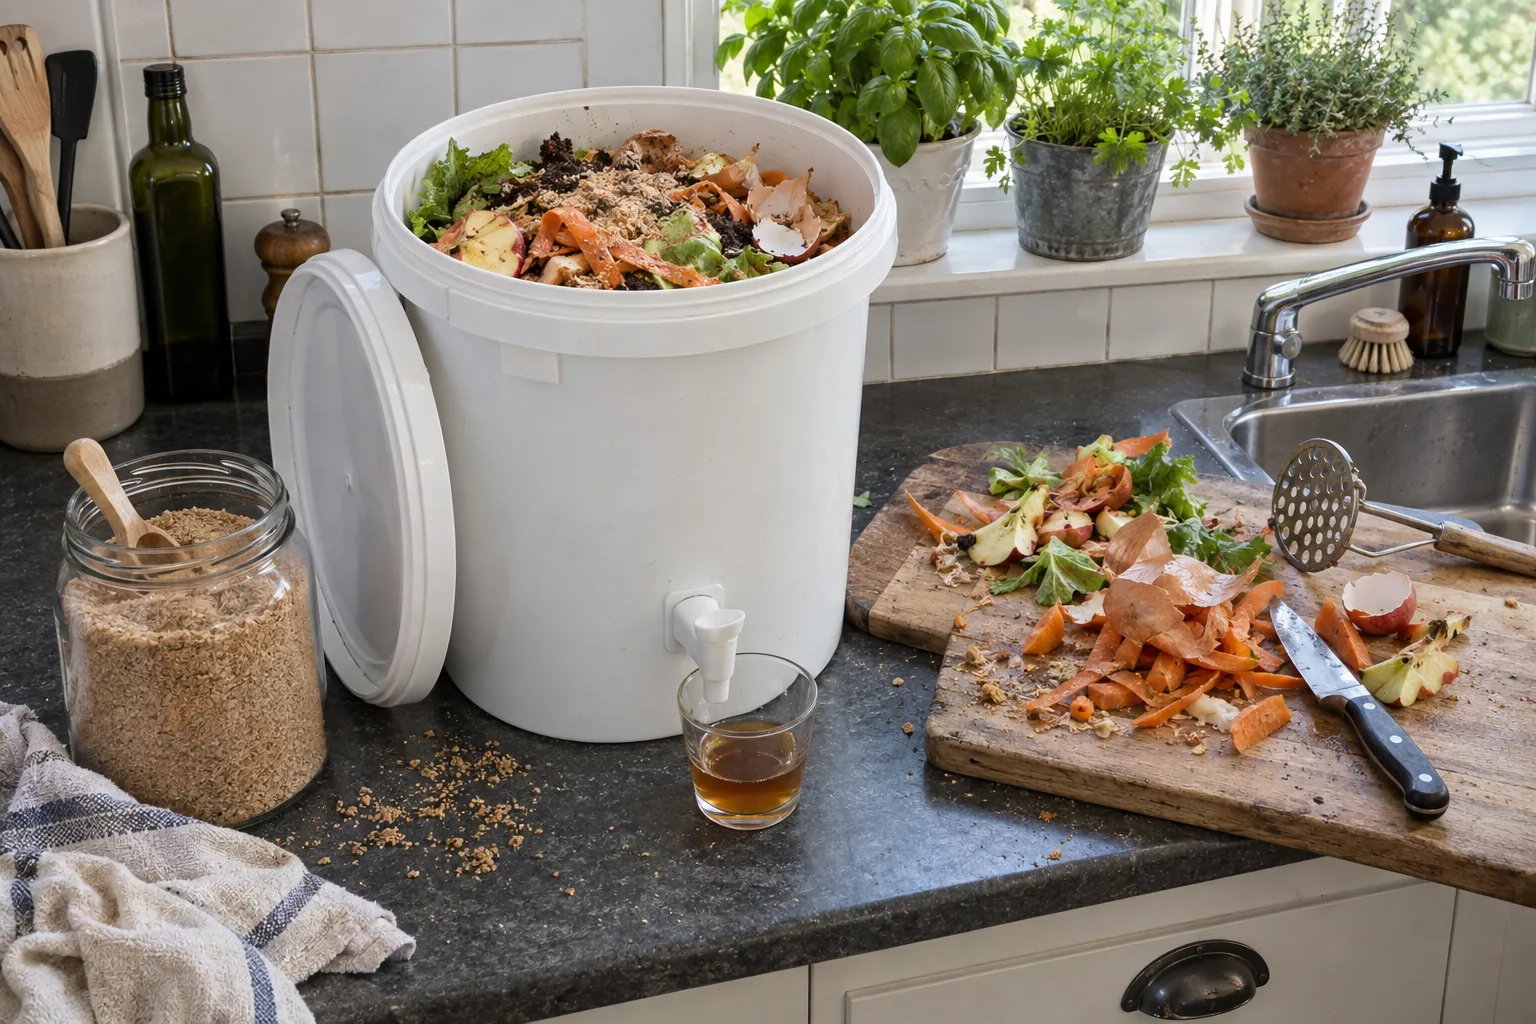
A traditional compost pile comes with a list of rules, and the strictest one concerns the kitchen. It allows no meat, no dairy and no cooked leftovers in the pile. Those scraps end up in the trash, even in a household that composts everything else. Bokashi composting takes a different route. Instead of letting food rot in the open air, it ferments the scraps in a sealed bucket, much like sauerkraut. Then it hands them over to the soil, which does the rest of the work. This guide explains how the method works, what you need, and how to turn a full bucket into garden soil, using advice from university extension services.
What Is Bokashi Composting?
Bokashi is a Japanese word usually translated as “fermented organic matter.” The modern method grew out of the work of Teruo Higa, a Japanese researcher. In the 1980s, he developed a blend of beneficial microbes for use in agriculture. Today, Washington State University Extension describes bokashi composting as an anaerobic fermentation system for food waste. It is built on two things, a sealed container and a bran inoculated with bacteria and yeast.
The bran carries lactic acid bacteria, yeasts and phototrophic bacteria. When you sprinkle it on food scraps and shut out the air, those microbes ferment the waste rather than let it rot. As a result, the scraps turn sour and acidic, and they keep most of their nutrients. However, the product is not finished compost. WSU calls it a pre-compost, which must be buried in soil or added to another compost system to break down completely.
How Bokashi Composting Differs From a Compost Pile
A regular compost pile is aerobic. It needs oxygen, a balance of greens and browns, and regular turning, as our guide to composting for beginners explains. Bokashi composting works the other way around. It keeps oxygen out, it needs no browns, and you never turn it.
That difference changes what you can add. According to WSU, a bokashi bucket can take fruit and vegetable scraps, cooked food, dairy, meat and even small bones. Because fermentation happens in a closed container, the bucket produces very little odor, and the acidity suppresses pathogens and weed seeds. On the other hand, the method has a running cost, since you need a steady supply of bran. It also needs a place to finish, whether that is a garden bed, a compost pile or a tub of soil.
What You Need to Start
The equipment is simple, and most of it can be homemade. What matters is a good seal and a reliable supply of microbes.
A Bucket With a Tight Lid
Commercial bokashi bins usually have a snug lid, an inner false bottom and a small spigot for draining liquid. They work well, but they are not the only option. The University of Saskatchewan gardening program explains that a bucket needs either a false bottom or a dry base. Its guide suggests 2 to 3 inches of dry sawdust at the bottom to soak up extra liquid. So a food-grade bucket with a tight lid and a layer of sawdust can do the same job. Many gardeners keep two buckets, so one can ferment while the other fills.
Bokashi Bran
The bran is the engine of the whole system, and it is easy to find. It is usually wheat bran or rice hulls soaked in a microbial culture, often with molasses, and then dried for storage. You can buy it from garden centers or online, and some gardeners make their own once they are comfortable with the process. In any case, store it in a cool, dry place with the bag closed. WSU suggests replacing bran that smells musty or neutral instead of sour or yeasty.
Bokashi Composting Step by Step
The daily routine takes only a minute or two. The key, however, is to repeat the same steps every time you add scraps.
Chop and Layer the Scraps
Start by chopping bulky scraps into small pieces. USask suggests pieces of about 2 to 3 inches, because smaller bits pack more tightly and leave less air. Then add the food in layers about 1 inch deep, and sprinkle 1 to 2 tablespoons of bran, roughly a small handful, over each layer. If a layer holds a lot of meat or dairy, a little extra bran does no harm.
Press Out the Air
Next, press the scraps down firmly. USask recommends placing a plate that fits snugly inside the bucket on top of the food and pushing down to squeeze out the air. A potato masher also works well for this part of the job. After that, close the lid tightly, and keep it closed whenever you are not adding food. Every time the bucket stays open, oxygen gets in, and the fermentation suffers.
Drain the Liquid
As the scraps ferment, they release a liquid, often called bokashi tea. WSU advises draining it every few days to prevent bad odors. If your bucket has a spigot, simply open it into a cup. If it has a sawdust base instead, the sawdust absorbs the liquid, and you may need a little more as the bucket fills.
Let the Full Bucket Ferment
When the bucket is full, close it and set it aside at room temperature. WSU gives about 10 to 14 days of fermentation after filling, and USask suggests a minimum of 2 weeks. Meanwhile, start a second bucket for the new scraps that keep coming in. A finished bucket can also wait for several months, according to USask, which helps in winter when the ground is frozen.
What Can Go Into a Bokashi Bucket
Bokashi composting accepts almost all kitchen waste. USask lists vegetable and fruit scraps, grain-based products, coffee and tea waste, eggshells, meat, bones, dairy and cooked food. That covers most of what a typical kitchen throws away.
A few things, however, should still stay out of the bucket. Avoid soups, sauces and other free liquids, since WSU warns that very wet contents stress the microbes and turn slimy. Likewise, leave out moldy food that has already started to rot, as well as plastic, large bones and anything that is not food. Before scraps reach the bucket, check our guide to growing vegetables from scraps to see which ones will regrow.
Finishing Bokashi Composting in the Soil
After fermentation, the scraps still look much like they did going in. A carrot peel still looks like a carrot peel. According to USask, the change happens at the cellular level, and it makes the waste much easier for soil microbes to break down. WSU adds that the material is acidic and biologically active, so you should never leave it exposed or spread it as mulch.
Bury It in a Trench
Burying is the most common way to finish the process. First, dig a trench in a bed that is not planted yet. Then mix the fermented scraps with at least 2 to 3 times their volume of soil, as WSU advises, and cover them completely. Finally, firm the soil lightly to remove air pockets.
WSU suggests waiting at least 2 weeks, and ideally 3 to 4, before planting over the spot, with longer waits in cool soil. The USask program takes a more cautious view of the timing. It notes that the area stays too acidic for planting for 6 to 8 weeks. For that reason, keep new trenches a few inches away from existing plants. A good rhythm is to bury each bucket in a different section of a bed and then plant that section a month later. If you want to watch the effect on your beds, our guide to soil pH levels explains how acidity changes over time.
Add It to a Compost Pile
If you already have a compost pile, the fermented scraps can go straight in. WSU treats bokashi as a green input for the pile, just like fresh kitchen scraps. Bury it in the center and balance it with browns such as leaves, straw or cardboard. The microbes in the pile colonize it quickly, and it covers the scraps a normal pile cannot take. The fermented material can also help to start a lasagna gardening bed, as long as it is buried under several layers.
Use a Soil Tub Indoors
Apartment gardeners can finish bokashi without a yard, using the indoor tub method that USask describes. Put several inches of garden soil in the bottom, pour in the bucket and mix it well, and then cover it with more soil. After 2 weeks, check how the breakdown is going. After about 6 weeks, the scraps should be gone completely.
USask warns against sterile potting soil for this step, because the process depends on soil life. WSU suggests a ratio of about 1 part bokashi to 3 parts soil. The finished blend can then go into beds or containers around the garden. Our guide to the best soil for container vegetables shows how to mix it with other ingredients.
Using Bokashi Tea
The liquid you drain is rich and acidic, so never pour it on plants undiluted. WSU says it can be used in diluted form to support soil biology. A common rule of thumb is about 1 part tea to 100 parts water, applied to the soil rather than the leaves. Use it within a day or two of draining, since it does not keep well.
Both WSU and USask also mention pouring leftover tea down the drain to help with organic buildup. It is a handy way to use extra liquid, but it is not a substitute for a plumber. Bokashi tea is also different from aerated compost tea, which is brewed on purpose from finished compost. Our compost tea recipe explains that method step by step for beginners.
Troubleshooting Bokashi Composting
A healthy bucket smells sour and pickled, a little like vinegar or beer. That smell is the best way to judge how things are going.
A Rotten Smell
A putrid, sulfur or ammonia smell means that fermentation has failed and rot has taken over. WSU recommends adding a generous layer of bran right away, pressing the contents down firmly and checking that the lid seals properly. In future batches, chop the scraps smaller and add bran with every layer.
Colored Mold
A white, fluffy mold is a good sign. USask says it often appears within a few days and shows the process is working. By contrast, green, black or blue mold points to air exposure, too little bran or too much moisture. If only a small patch appears, remove it. If it spreads through the bucket, WSU advises emptying it and starting over.
Too Much Liquid
Slimy, wet contents usually come from watery foods such as fruit or leftovers. Add a dry material such as extra bran, shredded paper or cardboard, and drain the bucket more often. The same balance of moisture matters in the garden, as our guide to a raised bed soil mix explains.
Is Bokashi Composting Right for You?
Bokashi composting suits gardeners who want to keep all their food waste at home, including meat and dairy. It also works well in apartments, since the bucket fits under a sink and runs all year. However, it does not replace a garden or a compost pile entirely. You still need somewhere to finish the fermented scraps, and you need to buy or make bran.
For that reason, many gardeners combine it with other systems at home. A worm bin, for example, handles vegetable scraps well, and our guide to an indoor worm bin shows how to set one up. Fermented scraps can go to the worms too, but only in small amounts, because of their acidity. For more on what the worms give back, see our guide to using worm castings.
Frequently Asked Questions
Does bokashi composting smell?
A sealed bucket should smell only when you open it, and then only sour or pickled. A rotten smell means that air got in or there was too little bran.
How long does bokashi composting take?
Filling a bucket usually takes a few weeks, depending on your household. Then allow about 2 weeks of fermentation, followed by 2 to 6 weeks in soil or a compost pile before the scraps disappear.
Can I put fermented scraps straight on my plants?
No. The material is acidic, so it must be mixed into soil and left to break down before you plant over it. WSU warns never to place it directly against roots or trunks.
Getting Started With Bokashi Composting
Bokashi composting asks for very little, just a bucket with a tight lid and a bag of bran. After that, it needs only a few seconds each day to layer, sprinkle and press. In return, it takes the scraps a compost pile cannot handle and turns them into food for the soil. Start with one bucket and a spare, bury the first batch in an empty bed, and see how quickly the soil takes it in. Over time, those buried scraps add the organic matter that makes every bed easier to grow in.
Check out the author’s book here: The Year-Round Vegetable Garden for Beginners.


Leave a Reply