
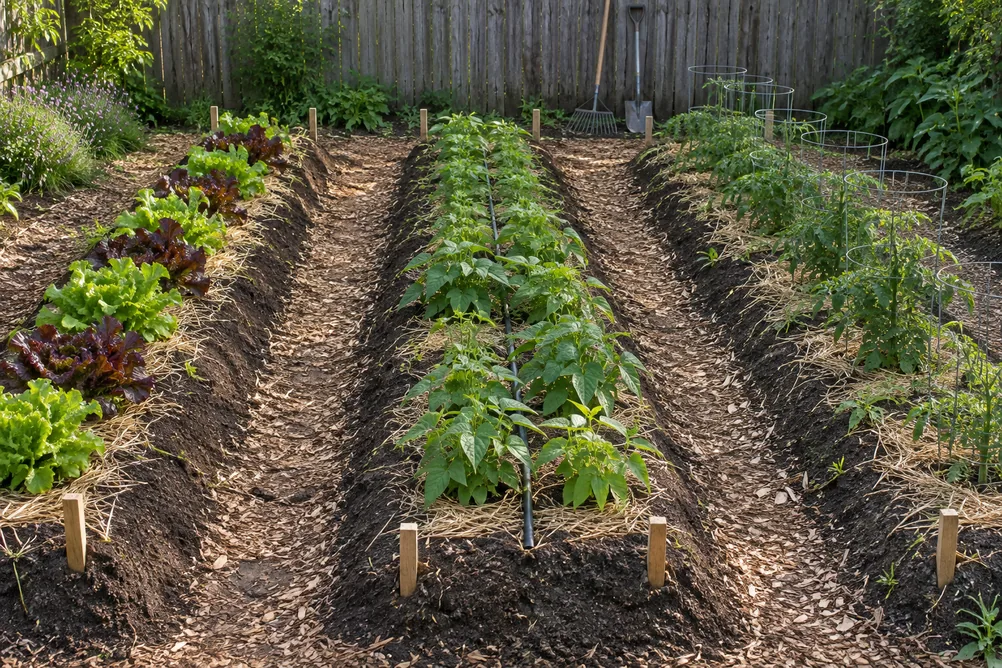
Raised beds solve a lot of problems, but the lumber can cost more than everything else in the garden combined. Mounded Row Gardening gives you most of the same benefits for the price of some compost and an afternoon with a shovel. You simply pile loose, enriched soil into long, flat-topped ridges and plant on top. There are no boards, no screws and no carpentry skills involved.
However, the method has real trade-offs, and it suits some gardens better than others. In this guide, I’ll explain what mounded rows are and when they beat both framed beds and flat ground. Then I’ll walk you through building them, planting them and keeping them in shape year after year.
What Mounded Row Gardening Means
A mounded row is a raised bed without walls. Instead of holding the soil in with boards, you shape it with a rake so the sides slope down to the path. Extension services call these unframed, unlined or mounded beds, and they all mean the same thing.
According to Clemson Cooperative Extension, a finished unframed bed should stand 4 to 8 inches high. The sides slope up at roughly a 45-degree angle, and the top is raked flat for planting. That flat top is the key difference from the narrow ridges some growers use for potatoes or sweet potatoes.
Although the idea sounds modern, it is one of the oldest ways to grow food. Farmers have piled soil into raised rows for centuries, long before anyone sold cedar bed kits. In a sense, mounded row gardening is simply the home-garden version of that old field practice.
Why Choose Mounded Row Gardening
The first reason is drainage. When the planting area sits above the surrounding ground, extra water runs off into the paths. As a result, roots stay out of soggy soil, and the risk of root rot drops. University of Maryland Extension lists this as a main benefit of any raised bed, framed or not.
The second reason is an earlier start in spring. Raised soil warms up faster than ground-level soil, so you can plant sooner. Meanwhile, you never step on the growing area, which keeps the soil loose and free of compaction.
The third reason is cost. Oregon State University Extension states plainly that unframed beds are less expensive than framed ones. Instead of paying for boards, you can spend that money on soil. For more ways to stretch the budget, see my guide to vegetable gardening on a budget.
When Flat Rows Work Just as Well
Mounds are not always necessary. Colorado State University Extension notes that simple rows are quick and cheap when the soil is sandy or loamy. Raised beds pay off mainly on heavy clay and on ground that drains poorly. So if your soil already drains well, flat rows may be the better choice.
The Honest Downsides
Every method has weak points, and this one has three that matter. First, the mounds are prone to erosion. Heavy rain and careless watering can wash soil from the sloped sides into the paths.
Second, mounded rows take up a larger footprint than framed beds. Because the sides slope, part of the width is not flat planting space. Oregon State gives a useful example: a bed 48 inches wide leaves about 36 inches of flat surface on top.
Third, raised soil dries out faster than soil at ground level. It also heats up and cools down more quickly. Therefore, you’ll need to water more often in midsummer, especially on sandy ground. UMD also warns that shaping mounds is harder with sandy soils, since the sides tend to slump.
What You Need for Mounded Row Gardening
One of the best things about this method is the short shopping list. You probably own most of the tools already, and the rest cost very little. Here is everything you need for a first row:
- A spade or digging fork to loosen the ground along each row.
- A sturdy garden rake to shape the sides and level the top.
- Stakes and twine to mark straight rows and protect the corners.
- Compost or well-rotted manure, as much as you can get.
- Mulch, such as straw, shredded leaves or grass clippings.
- A wheelbarrow, which saves a lot of trips when you move compost.
Compost is the only real expense, and it is also the best investment. If you make your own, you can build new rows almost for free. Otherwise, many towns sell bulk compost by the cubic yard, which costs far less than bagged products.
Choosing the Right Spot
Pick a site that gets at least six hours of direct sun, just as you would for any vegetable bed. Next, look at how water moves across the yard after a heavy rain. Mounded rows help most in the low, wet spots where flat beds struggle.
On sloping ground, run the rows across the slope rather than straight down it. That way each mound acts like a small terrace and slows the water down. Rows that run downhill, on the other hand, turn the paths into channels that carry soil away.
How to Build a Mounded Row Garden
The best time to build is a few weeks before planting, when the soil is moist but not wet. If a handful of soil forms a sticky ball, wait a few more days. Working wet soil ruins its structure and leaves hard clods behind.
Mark and Loosen the Rows
Start by marking each row with stakes and twine. Most gardeners make beds about 3 to 4 feet wide, which lets you reach the center from either side. Then leave paths of 2 to 3 feet between beds, as Clemson recommends, so you can move a wheelbarrow through.
Next, loosen the soil along the marked row with a spade or digging fork. Loosening the ground underneath lets roots grow well below the mound itself. If you’re starting on heavy ground, my guide to preparing loam soil explains how to improve its texture over time.
Add Organic Matter and Shape the Mound
Spread a thick layer of compost or well-rotted manure over the loosened strip. Then shovel soil from the paths onto the bed, mixing it with the compost as you go. The paths become slightly lower, and the bed rises by the same amount.
Now rake the soil into shape. Pull the sides into an even slope and level the top so water soaks in evenly instead of running off. Oregon State suggests aiming for about 8 inches of loose soil, which is enough for most vegetables to root well. For deeper crops, the loosened ground under the mound supplies the extra depth.
Finally, drive a sturdy stake at each corner of the row. Clemson recommends this simple trick because it stops a dragged hose from sliding across the bed and flattening the plants.
Planting and Watering Mounded Rows
Plant on the flat top, and keep taller crops toward the north side so they don’t shade the rest. Crop depth matters too. UMD suggests at least 8 inches of soil for leafy greens, beans and cucumbers, and 12 to 24 inches for peppers, tomatoes and squash. That’s why loosening the ground beneath the mound is so important for summer crops.
Watering needs a little care. A strong spray from a hose can cut into the sides and carry soil away. Instead, water slowly at the base of the plants, or better yet, lay a line of drip tape along the top of each row. My guide to drip tape installation shows how to set it up in an afternoon.
A layer of mulch helps with both problems at once. It holds moisture in the mound, and it shields the sloped sides from heavy rain. Straw, shredded leaves and grass clippings all work well. You’ll find more options in my guide to organic garden mulch.
Keeping Mounded Row Gardening Beds in Shape
Unlike framed beds, the rows you build with mounded row gardening need a little upkeep every year. Rain, foot traffic on the edges and settling all lower the bed over time. In addition, organic matter breaks down and disappears, so Oregon State advises adding more of it often.
Each spring, spread fresh compost over the top and rake the sides back into shape. This takes much less time than building the row from scratch. Also, pull any soil that has washed into the paths back onto the bed.
When a bed is empty, don’t leave it bare. Clemson suggests covering it with about 2 inches of mulch or planting a cover crop. A green manure cover crop holds the soil in place through winter rains and adds organic matter when you turn it under in spring.
Mounded Rows Compared With Other No-Frame Methods
Mounded rows are only one way to garden without boards. Hugelkultur buries logs and branches under the soil to build a much taller mound. It holds water well, but it takes more material and time to settle.
By contrast, the no-dig method layers compost directly on top of the ground without shaping any mound at all. It works best where drainage is already good. Mounded row gardening sits between the two, since the rows are quick to build and still lift roots above wet soil.
Mounded Row Gardening FAQ
How High Should a Mounded Row Be?
Clemson recommends a finished height of 4 to 8 inches. Even that modest rise makes a clear difference to drainage on heavy soil. Going much higher makes the sides steeper and more likely to erode.
Do Mounded Rows Need More Water?
Yes, usually a little more. Raised soil drains and dries faster than ground-level soil, so check moisture more often in hot weather. Mulch and drip irrigation close most of that gap.
Can I Use Mounded Rows for Every Crop?
Almost every vegetable grows well in a mounded row, from lettuce and beans to tomatoes and squash. Root crops such as carrots and beets especially like the loose, stone-free soil on top. The main exceptions are sprawling vines, which spill over the sides and into the paths. For pumpkins or winter squash, plant near the end of a row and let the vines run onto mulch beside it. That way the rest of the bed stays free for smaller crops.
Is Mounded Row Gardening Good for Beginners?
Mounded row gardening is one of the easiest ways to start. You need only a spade, a rake and some compost, so the upfront cost stays low. Before you begin, sketch a simple vegetable garden layout so you know how many rows you need.
Start With One Row This Season
You don’t need to switch the whole garden to mounded row gardening at once. Build a single mounded row this spring, plant it and compare it with the rest of your plot. If your soil is heavy or wet, you’ll probably see the difference within a few weeks. Then add more rows as your time and compost allow.
Check out the author’s book here: The Year-Round Vegetable Garden for Beginners.


Leave a Reply