
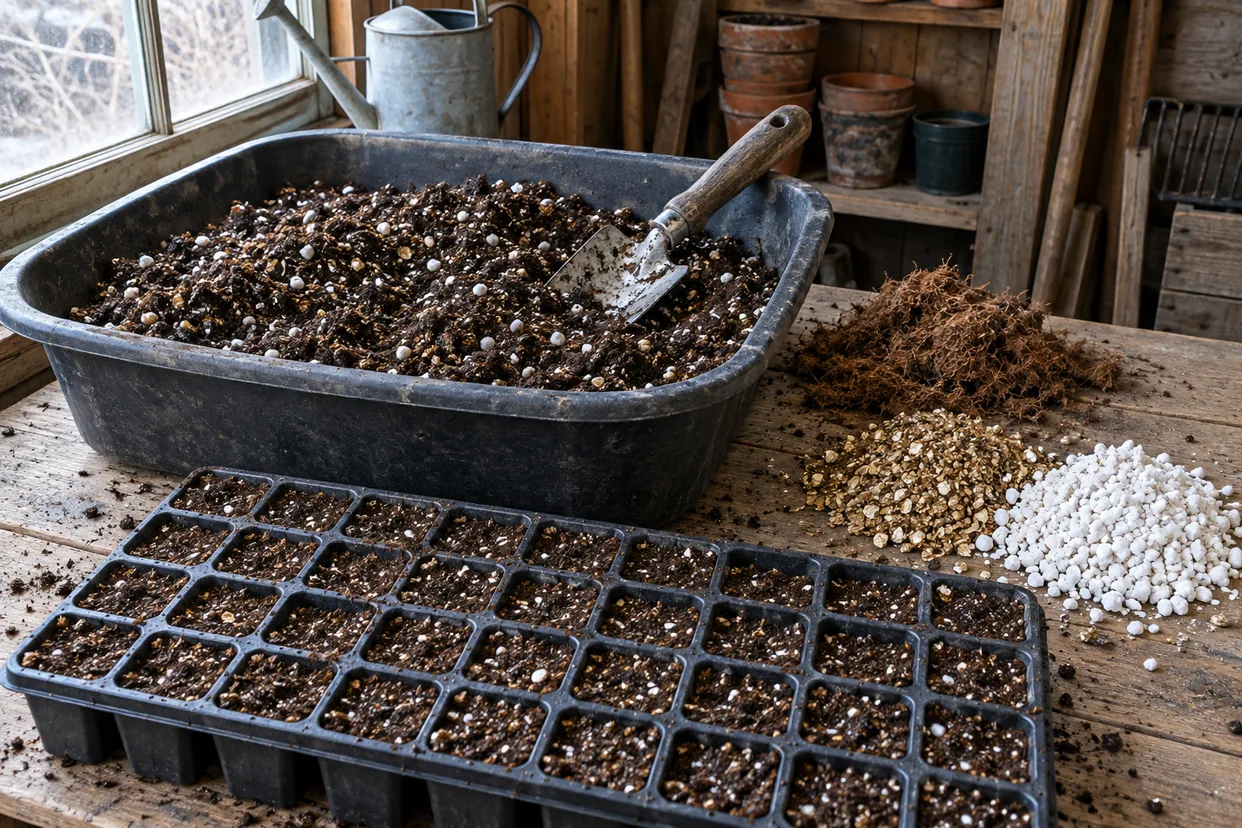
Most seed-starting problems begin before the seed goes in. Seedlings that rot at the base, trays that stay soggy for days, or a crust that the sprouts cannot push through often have the same cause: the wrong medium. A good Seed Starting Mix is light, clean and moist, and it gives tiny roots the air they need.
This guide explains what to look for in a bagged mix, how to make your own and why garden soil does not belong in a seed tray. The advice comes from University of Maryland Extension and Oregon State University Extension, with a classic recipe from Virginia Cooperative Extension.
What a Seed Starting Mix Must Do
A seed needs three things from its medium: moisture, air and a clean start. Virginia Tech sums up the job well. A germination medium should be fine and uniform, yet well aerated and loose. It should be free of insects, disease organisms and weed seeds. In addition, it should be low in fertility and soluble salts, and able to hold and move moisture by capillary action.
Each of those points solves a real problem. Fine particles keep small seeds in close contact with moisture. Loose texture leaves room for air, so roots do not suffocate. A clean mix protects seedlings from damping off, and low salts prevent young roots from burning.
Why Garden Soil Fails in Trays
It is tempting to scoop soil from the bed. However, UMD is blunt about it: don’t try to save money by using garden soil. It is too dense for the job and contains weed seeds and possibly pathogens.
In a bed, soil works because it is deep and full of life that keeps it open. In a shallow cell, by contrast, the same soil packs down after a few waterings. It drains slowly, stays wet at the bottom and often forms a hard crust on top. Seedlings in that kind of medium are prime targets for fungal rot; Damping Off Disease: How to Prevent Seedling Rot and Fungal Death explains how that disease strikes.
Raised beds and containers each need their own blends, too. For beds, see Raised Bed Soil Mix: The Perfect Ratio for Growth.
The Ingredients of a Seed Starting Mix
Most commercial blends are soilless. According to UMD, they usually contain some proportion of sphagnum peat moss, perlite and vermiculite, and they are generally free of diseases, weed seeds and insects. Each ingredient has a role.
Peat Moss or Coir
Peat moss is the base of most mixes. As UMD explains, it holds water very well, yet its large pore spaces let excess water drain easily. That high porosity also promotes quick, extensive root growth.
Coir, made from coconut husk fibres, is the main alternative. UMD lists it as a substitute for peat, and Oregon State uses it interchangeably with peat in its recipes. It behaves much like peat, although it usually needs less effort to wet.
Vermiculite
Vermiculite is a mineral expanded by heat into light, spongy flakes. It holds both water and nutrients, and it keeps the mix soft. Fine vermiculite is also ideal for covering small seeds.
Perlite
Perlite is volcanic glass puffed into white granules, the small white “popcorn” UMD mentions. It holds little water itself. Instead, it opens air spaces and speeds drainage, which is exactly what a crowded cell tray needs.
Buying a Seed Starting Mix
For most gardeners, a bag is the simplest option. Interestingly, UMD says you do not need a special finer seedling mix: a standard, all-purpose transplanting mix works. Still, a fine seed starting mix is easier to use in small cells and with tiny seeds.
When you shop, check the label and squeeze the bag. Here is what to look for:
- A soilless base. Peat or coir, with perlite, vermiculite or both.
- A light texture. The mix should feel fluffy, not heavy or clumped.
- No bark chunks. UMD advises avoiding heavy, dense mixes that contain “forest products”.
- A modest starter charge. A little fertilizer is fine, but a seed does not need much.
How to Make Your Own Seed Starting Mix
Mixing your own costs less if you start a lot of trays. Moreover, you control exactly what goes in. There are two classic approaches.
The Peat-Lite Recipe
The Virginia Cooperative Extension guide to plant propagation from seed gives a recipe that commercial growers have used for decades:
- 4 quarts of shredded sphagnum peat moss
- 4 quarts of fine vermiculite
- 1 tablespoon of superphosphate
- 2 tablespoons of ground limestone
The limestone balances the natural acidity of the peat. Consequently, the finished mix sits in a range that most vegetable seedlings like. If you want to know more about acidity, Soil pH Level: Testing and Balancing for Maximum Yield explains the scale.
The Thirds Recipe
Oregon State suggests a simple three-part blend: one-third pasteurized soil or compost, one-third sand, vermiculite or perlite, and one-third coconut coir or peat moss. Alternatively, many gardeners simply use half coir or peat and half perlite, vermiculite or sand. OSU notes that this combination seems to work well, too.
UMD also suggests mixing compost 1:2 with a soilless medium. Similarly, a small amount of worm castings can add gentle nutrients; Using Worm Castings: How Much, Where, and What to Expect gives the right rates.
Pasteurizing Soil and Compost
Peat, coir, vermiculite and perlite are clean from the bag. Soil and compost are not. So if your homemade seed starting mix includes them, heat them first.
Virginia Tech’s method is to place slightly moist soil in a heat-resistant container in an oven set at about 250°F. It must reach 180°F and stay there for at least half an hour. Avoid overheating, which is extremely damaging to the soil. Also, expect a strong earthy smell in the kitchen.
Using Your Seed Starting Mix
A good mix can still fail if it goes into the trays dry. Peat, in particular, repels water when it is bone dry.
Pre-Moisten the Seed Starting Mix
Pour the mix into a tub and add warm water a little at a time. Stir with your hands until it feels like a wrung-out sponge: moist, but with no water dripping out when you squeeze it. Then fill the cells loosely and tap the tray to settle the mix, without pressing it down.
Next, clean your containers before you fill them. Oregon State recommends washing pots, trays and flats, then rinsing them in a solution of 1 part chlorine bleach to 9 parts water.
Sow at the Right Depth
Virginia Tech’s rule is to sow at a depth of about twice the diameter of the seed. Very fine seeds should not be covered, but pressed lightly into the surface. Check the packet, too; Reading Seed Packets: A Guide to Understanding Maturity Timelines shows what each line means.
Water from Below
After sowing, water trays from the bottom so the surface stays loose and the seeds do not wash away. The mix draws water up by capillary action, which is precisely why a fine, uniform texture matters. Bottom Watering Seedlings: The Best Way to Prevent Overwatering and Fungus Gnats walks through the method.
Feeding Seedlings After Germination
A seed carries its own food for the first days. After that, a low-nutrient mix runs out quickly. Virginia Tech notes that these mixes have little fertility, so seedlings must be watered with a diluted fertilizer solution soon after they emerge.
Later, it recommends a soluble houseplant fertilizer at the manufacturer’s dilution, about every two weeks once the seedlings are established. Seedlings that stay in small cells for long may still go hungry. In that case, move them up to larger pots with a richer potting mix. A potting mix needs more structure than a seed mix, because it has to hold a bigger plant for weeks; Best Soil for Container Vegetables: Air Space Before Nutrients explains why air space comes first.
Light, Thinning and Hardening Off
Even the best mix cannot make up for poor light. Seedlings that stretch toward a dim window grow long, pale stems that flop over. If that happens, Leggy Seedlings: How to Fix Weak Plant Stems shows how to rescue them. Virginia Tech also notes that most seedlings prefer night temperatures of 55 to 60°F and day temperatures of 65 to 70°F, which keeps growth sturdy rather than soft.
When several seeds sprout in one cell, keep the strongest and snip the rest at the surface. How to Thin Seedlings: When, How, and How Far Apart covers the timing. Finally, before planting out, give the young plants a week outdoors to adjust; Hardening Off Plants: How Much Stress Is Enough sets out a schedule.
When to Start
Old seed is worth checking before you fill a single tray. Seed Germination Test: How to Check If Your Old Seeds Will Grow shows a simple paper-towel method.
Timing depends on the crop. Oregon State notes that most vegetable and flower seedlings are started indoors four to 12 weeks before the last average spring frost. Seed Starting Calendar: How to Plan Your Vegetable Gardening Year helps you plan each sowing, so the right bag of seed starting mix is ready in time.
Check out the author’s book here: The Year-Round Vegetable Garden for Beginners.




Leave a Reply