
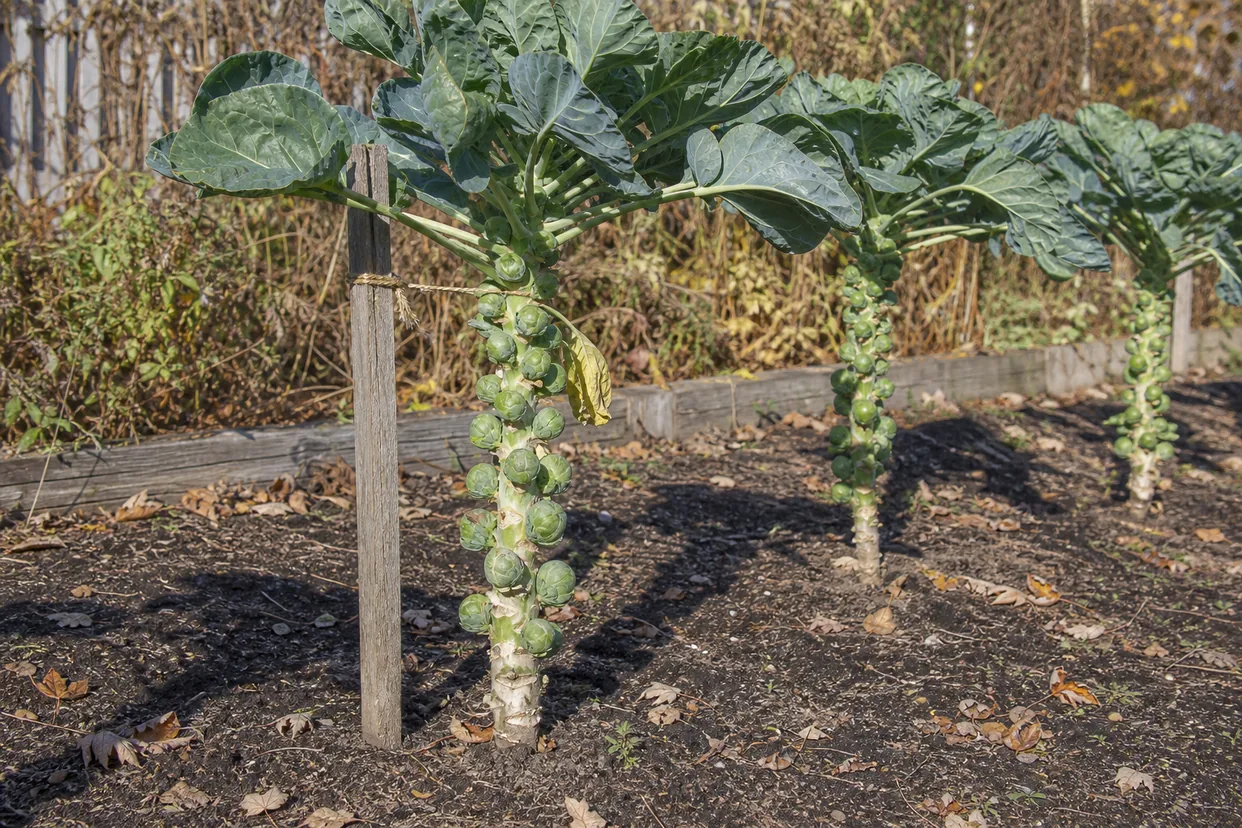
Nothing else in the vegetable garden asks for so much patience. Growing Brussels sprouts means giving one plant a bed for five or six months, watching it look like a scruffy cabbage on a stick for most of that time, and trusting that something will happen down at the stem. Then autumn arrives, the sprouts firm up, and the first hard frost turns them sweet.
Brussels sprouts (Brassica oleracea var. gemmifera) fail for beginners in three predictable ways: sown too late, spaced too close, or grown in ground too loose. Get those three right and the rest is watering and waiting.
Growing Brussels Sprouts at a Glance
| Difficulty | Moderate — easy to grow, hard to time |
| Days to maturity | 90 to 180 from transplant, depending on variety |
| Sow | Late spring indoors, for a fall and winter harvest |
| Sun | Full sun, 6 hours minimum |
| Soil | Fertile, firm, well drained, pH 6.0 to 7.0 |
| Spacing | 18 to 24 inches apart, rows 24 to 30 inches |
| Water | 1 to 1.5 inches a week, without gaps |
| Harvest | Bottom sprouts first, at 1 to 1.5 inches |
| Best after | A hard frost, which sweetens the whole stalk |
Why Growing Brussels Sprouts Takes All Summer
The plant does two separate jobs in one season. Through summer it builds a tall stem and a canopy of big leaves, storing everything it can. Then, as nights cool and days shorten, it converts that store into sprouts — one at every point where a leaf meets the stalk.
Growing Brussels sprouts well is mostly about protecting that first job. Rush it and there is nothing to convert. That is why a plant set out in July gives you a stalk of loose green rosettes in November instead of tight sprouts.
Heat is the other half of the problem. Sprouts formed in warm weather open up rather than closing tight, so the whole plan is to have the stem finished by late summer and the sprouts filling as the temperature drops. Its close relatives run on the same clock, which is why growing brassicas is mostly an exercise in timing.
When to Start Seed for a Fall Harvest
Growing Brussels sprouts starts four months before you want to eat any. Count backward from your first frost, then add a margin. Most varieties need 100 to 120 days from transplant, and the plant keeps improving for weeks after that.
- Start seed indoors in late spring, roughly four months before you want the first sprouts.
- Grow on for four to five weeks, until the seedlings have three or four true leaves.
- Harden off over a week before they go outside, which is the step people skip and regret.
- Transplant in early summer, into ground that has already been fed.
Southern gardeners flip this and sow in late summer for a winter crop. Either way the sprouts need to form in cool weather. The seedling stage is worth doing well, and the reasoning behind hardening off plants applies here more than to almost any other crop.
Transplants beat direct sowing for this one, because you control the early weeks completely. The trade-offs for other crops sit in direct sow vs transplant.
Soil and Site: Firm Ground Matters Most
Growing Brussels sprouts in fluffy ground is the commonest mistake of the lot. Here is the advice that separates tight sprouts from loose ones: plant into firm soil, and firm it again around the stem after transplanting.
A Brussels sprout plant reaches three feet and carries a heavy head of leaves. In loose, fluffy ground it rocks in the wind, the roots tear, and the sprouts open into little cabbages. Tread the bed gently before planting. Press the soil hard around each stem with your knuckles.
The rest of the site is straightforward:
- Full sun, six hours and preferably more.
- Rich ground, dug through with compost the season before.
- pH between 6.0 and 7.0, which also suppresses clubroot. Where you stand is a five-minute test, described in soil pH testing.
- Ground that has not grown brassicas for three years, for reasons covered in vegetable crop rotation.
In a raised bed, the firmness rule fights the usual advice about fluffy mix. Add compost and let the bed settle for a few weeks before planting, rather than planting into fresh, airy raised bed soil.
Growing Brussels Sprouts With Enough Room
Give each plant 18 to 24 inches, with 24 to 30 inches between rows. Maryland Extension puts the home garden spacing in the same range.
That looks absurd in June, when the transplants are six inches tall and the bed is mostly bare. Fill the gaps with lettuce or radish, which come and go before the sprouts need the room.
Crowded plants stretch toward the light, and a stretched stem carries fewer, looser sprouts. This is a crop where the spacing on the packet is a minimum rather than a suggestion. Fast catch crops between the rows are the usual fix, and the pattern is laid out in the companion planting guide.
Growing Brussels Sprouts Through the Heat
Midsummer is the hard part, and the plant asks for two things.
Water, without gaps. One to one and a half inches a week, at the root, delivered steadily. A dry fortnight in August shows up as small sprouts in November, and the plant never catches up.
Nitrogen early, not late. Feed once about four weeks after transplanting and again in midsummer, then stop. Late nitrogen produces soft leafy growth and loose sprouts. If the lower leaves go pale and yellow before their time, the plant is telling you something, and the signs of nutrient deficiency are readable.
A summer mulch does most of the watering work for you by holding moisture in the top few inches. Straw, leaf mold, or grass clippings all work, as set out in organic garden mulch.
Tall plants in an exposed bed need support by late summer. A single stake and one tie at two feet is enough. Drive the stake in at planting, not in October, when the roots are already spread through the bed and every push of the stake tears them.
Stripping Leaves and Topping the Plant
Two small jobs make a visible difference in autumn.
Strip the lower leaves as the sprouts below them swell. Snap off any leaf that has yellowed, working upward as the harvest moves up the stalk. Air moves better around the sprouts and aphids have fewer places to hide.
Top the plant, optionally, three to four weeks before you want the whole stalk at once. Minnesota Extension describes cutting out the growing tip when the lowest sprouts are about an inch across, which pushes the upper sprouts to size up together.
Skip the topping if you would rather pick a few at a time from October through December. Both approaches are correct; they just answer different questions about your kitchen.
Pests That Target the Stalk
Everything that eats cabbage eats this plant, and it stands in the garden long enough for all of them to find it.
| Pest | What you see | What works |
|---|---|---|
| Cabbage worms and loopers | Ragged holes, green caterpillars | Hand picking, Bacillus thuringiensis per the label |
| Aphids | Grey clusters inside the sprouts | Strong water spray early, before sprouts close |
| Cabbage root maggot | Sudden wilting of young transplants | Collars at the stem, covered beds |
| Harlequin bugs | Pale stippling, black and orange shield bugs | Hand picking into soapy water |
Covering the bed from transplanting until the weather cools stops most of it, and the weights and handling are in floating row covers. Aphids are the one to catch early, because once a sprout closes around them no spray reaches inside — the methods are in aphid control.
Encouraging the insects that eat the pests is the slow answer and the durable one. Sweet alyssum and dill along the row bring in parasitic wasps and hoverflies, which is the case made in beneficial insects for the garden.
Growing Brussels Sprouts in Cold Climates
North of zone 5 the crop is not harder, only tighter on time. Three adjustments cover it.
Choose an early variety. Anything listed at 90 to 100 days finishes before deep winter, while the 150-day heirlooms are a southern luxury. Read the packet number as a promise made in ideal weather, then add two weeks.
Start seed a fortnight earlier than the general advice, so the stem is built before the nights turn. A plant that reaches full height by late August has time to fill.
Mulch the base heavily in late fall. Six inches of straw around the stem keeps the roots working after the surface freezes, and the plant keeps feeding its sprouts for weeks longer.
The sprouts themselves are tougher than the gardener expects. They take temperatures into the low twenties without damage and hold their quality through repeated freezing and thawing, which almost nothing else in the bed will do.
Where winter arrives hard and stays, cut the whole stalk before the ground freezes solid and stand it in a bucket of damp sand in a cold shed. It behaves like living storage for a month or more.
One caution for warm regions, which is the opposite problem. Sprouts formed above 75°F open out into loose rosettes and turn bitter, so a southern garden sows in late summer and harvests in midwinter. Timing, in both directions, is the whole game.
Harvesting From the Bottom Up
Growing Brussels sprouts pays out slowly, and that is a feature. Sprouts ripen from the ground upward, over weeks rather than all at once.
Pick when a sprout is firm, tight, and 1 to 1.5 inches across. Twist it sideways and it comes away cleanly; if you are pulling hard, it is not ready. A loose sprout will not tighten later, so take it now and use it.
The plant carries on producing above what you picked, often into December in mild winters. The general signals for a dozen other crops are gathered in the guide to harvesting vegetables.
To store, cut the whole stalk at the base and stand it in a cold shed or garage. Sprouts keep far better on the stem than off it.
Why Frost Makes Them Sweet
Cold triggers a real chemical change. Faced with freezing, the plant converts stored starch into sugars, which lower the freezing point inside its cells and keep them from bursting.
The result is a sprout that tastes different in November than it did in September. The bitterness that puts people off is largely a summer-harvest problem. Anything below about 28°F does it.
So there is no hurry. Leave the stalk standing through repeated frosts, pick as you need, and let the weather do the seasoning. It is the same reason the fall vegetable garden tastes better than the summer one.
What Goes Wrong When Growing Brussels Sprouts
| Problem | Cause | Fix next year |
|---|---|---|
| Loose, open sprouts | Loose soil, heat, or late nitrogen | Firm the ground, plant earlier, stop feeding by midsummer |
| No sprouts at all | Transplanted too late | Start seed four months before first frost |
| Tiny sprouts | Drought in midsummer or crowding | Steady water, 18 to 24 inch spacing |
| Aphids inside the sprouts | Missed the window before they closed | Cover early, strip lower leaves, spray while open |
| Plant fell over | No support in an exposed bed | One stake and a tie by late summer |
| Bitter flavor | Picked before any frost | Wait for the cold |
Growing Brussels Sprouts Questions Answered
Can I grow them in a container?
Yes, in a large one. A single plant needs at least a five-gallon pot, deep rather than wide, and it will need staking and daily water in summer. One plant per pot, no exceptions.
Why are my sprouts loose and leafy?
Almost always soil that was too loose, ground too rich in late nitrogen, or heat while the sprouts were forming. Firm the bed hard at transplanting and stop feeding by midsummer.
Should I remove the leaves?
Remove the yellowing lower ones as the sprouts below them fill. Leave the healthy canopy on top, since that is the factory feeding everything below it.
How late can I harvest?
Through hard frost, and often into midwinter in zone 6 and warmer. The stalk stands in the bed as living storage.
Do I have to top the plant?
No. Topping evens out the sprouts for a single big harvest, while leaving the tip gives a longer, staggered picking season.
Half a Year, One Stalk
Growing Brussels sprouts is the longest bet in the vegetable garden, and it pays out exactly when everything else has finished. Start the seed in late spring, plant into firm ground, water without gaps, and give each plant more room than feels sensible. Then wait for a hard frost, and pick from the bottom.
Check out the author’s book here: The Year-Round Vegetable Garden for Beginners.
Leave a Reply