
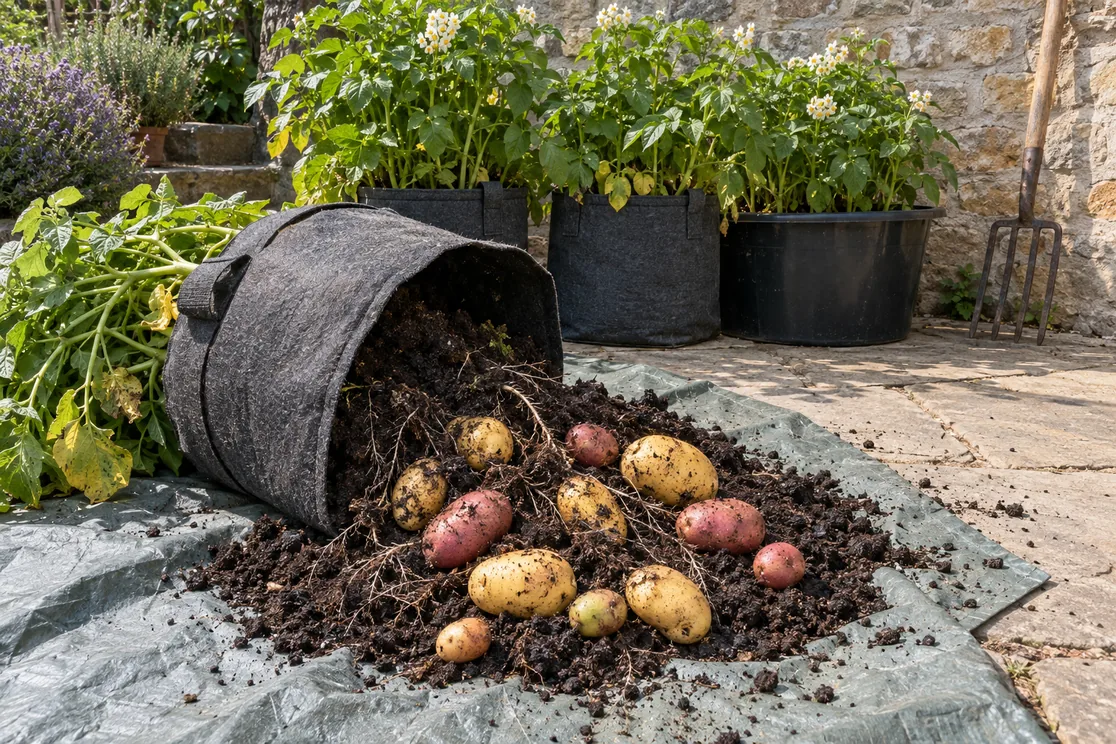
Potatoes are one of the most rewarding crops for a beginner, and you do not need a garden bed to grow them. A deep container on a patio, a balcony or the edge of a driveway can produce a real harvest. In addition, the soil in a pot warms quickly in spring, weeds are rare, and there is no digging at the end. You simply tip the container over and collect the potatoes. This guide shows how to grow potatoes in containers step by step, from choosing seed potatoes to curing and storing the harvest.
Why Grow Potatoes in Containers?
There are several good reasons to try this method, even if you have ground available. First, a container lets you control the soil completely, which matters because potatoes like loose, well-drained soil rich in organic matter. Second, you avoid soil that may carry potato diseases from earlier crops. Third, the harvest is clean and easy, because the tubers sit in soft potting mix instead of heavy clay.
This method is also backed by research from university extension services. The University of Maryland Extension, in its guide to growing potatoes in a home garden, states that potatoes can be grown successfully in containers. That page also adds a useful warning, which we will come back to: tall potato “towers” usually do not work.
Step 1: Start With Certified Seed Potatoes
A seed potato is not a seed in the usual sense of the word. Instead, it is a whole potato, or a piece of one, that sprouts from its buds, which gardeners call eyes. Every plant you grow starts from one of these pieces, so their quality decides much of the result.
It is tempting to plant a sprouting potato from the kitchen, but there are two problems. According to the University of Florida’s page on growing potatoes, grocery store potatoes are treated to prevent sprouting. UMD adds that supermarket potatoes can carry diseases without showing any symptoms. For the same reason, saving your own tubers from last year is generally not worthwhile, since viruses often show up the following season.
Look for certified disease-free seed potatoes from a garden center, a feed store or an online supplier. UMD recommends firm, unsprouted tubers, because wilted and heavily sprouted ones have less vigor. For a first attempt, choose one early variety for new potatoes and perhaps one later variety for storage.
Chitting and Cutting
Chitting means letting the seed potatoes sprout before planting, which gives them a head start. UMD calls this “green sprouting” and describes a simple method that works on any windowsill. Keep the whole tubers in the dark at room temperature until they sprout, then move them into the light to keep the sprouts short and sturdy. Our guide to chitting potatoes covers the process in more detail.
Small seed potatoes can go in whole, with no cutting at all. Larger ones can be cut into pieces of about 1½ to 2 ounces, each with one to three eyes. As a rough rule, UMD notes that a 6-ounce potato gives four seed pieces. Afterward, let the cut pieces dry for a few days, as both UMD and UF advise, so the cut surface heals and resists rot.
Step 2: Pick a Pot to Grow Potatoes in Containers
Almost any large, sturdy container works, as long as it drains well. Popular choices include fabric grow bags, large plastic tubs, half barrels and deep storage boxes with holes drilled in the base. If you are choosing between fabric bags, Grow Bags for Vegetables: Sizes, Fabric, and What Grows Best in Each compares the sizes in detail.
Depth is the key measurement, because you will add soil as the plants grow. UF’s container method uses a pot at least ten inches deep, but that is a minimum rather than a target. For a useful harvest, many gardeners use fabric bags of 10 to 20 gallons, which leave room for several inches of extra mix later. A larger volume also holds more water, so the soil dries out less quickly in summer.
Drainage is the one feature you cannot skip. Potatoes rot in waterlogged soil, so every container needs holes in the base or low on the sides. Color matters too, especially in hot climates. UMD notes that soil temperatures above 80°F inhibit tuber development, and a black pot in full sun can easily pass that. For this reason, fabric bags and light-colored containers are often the safer choice.
Step 3: The Best Soil Mix to Grow Potatoes in Containers
Garden soil packs down in a pot, so use a quality potting mix instead. A blend of potting mix and compost gives the loose, rich texture potatoes need. UMD also notes that potatoes have a high requirement for nutrients and grow best in soil with plenty of organic matter and a pH of 6.0 to 6.5. Our guide to the best soil for container vegetables explains how to build a good blend.
Before planting, mix in a balanced fertilizer at the rate on the label. UMD recommends feeding before planting and again about six weeks later, when tubers begin to form.
Step 4: Plant and Hill as You Grow Potatoes in Containers
Timing comes first, because cold soil is the main risk at planting. UMD advises waiting until the soil is at least 45°F, since seed pieces languish or rot during long cold spells. Potatoes tolerate light frost but not a hard freeze. If you are unsure, our guide to soil temperature for planting shows how to check.
Planting the Seed Pieces
Put about four to six inches of mix in the bottom of the container. Then set the seed pieces on top, cut side down and sprouts facing up. UMD spaces potatoes 8 to 12 inches apart in the row, which means three or four pieces in a large bag. After that, cover them with three to four inches of mix and water gently until the soil is evenly moist.
Hilling as the Plants Grow
When the stems reach six to eight inches tall, add more mix around them. Leave the top few inches of leaves above the surface. Repeat this every week or two until the soil is close to the rim of the container. This process, called hilling, keeps the developing tubers covered. UMD explains that light causes greening, and green potatoes should not be eaten.
Why Towers Are a Poor Way to Grow Potatoes in Containers
It seems logical that more hilling means more layers of potatoes, and many online plans promise exactly that. However, UMD points out that tubers develop close to the original seed piece. As a result, a tall tower filled with soil mostly adds weight, not potatoes. A container two to three feet deep, hilled to the rim, gives a better return for the effort.
Daily Care When You Grow Potatoes in Containers
Once the plants are up, care comes down to four things: sun, water, food and a watchful eye.
Sun
UMD recommends at least six hours of direct sun a day and prefers eight to ten. Fewer hours give lush leaves but only small tubers at harvest time. A garden sun map helps you find the right spot, and containers make it easy to move the plants if you guess wrong.
Water
Watering is the main job with container potatoes, because a pot dries out much faster than the ground. UMD links too much or too little water to many tuber problems, including cracks, blackheart and misshapen potatoes. Therefore, aim for soil that stays evenly moist, never soggy and never bone dry. In hot weather, that may mean watering every day. Check by pushing a finger into the mix, and water at the base rather than over the leaves.
Feeding and Mulch
Side-dress with fertilizer about six weeks after planting, when tubers start to form, as UMD suggests. Organic options such as compost or a balanced granular feed work well, as our guide to organic plant food explains. After the last hilling, add a layer of straw on top. According to UMD, straw mulch keeps the soil cool and moist and deters Colorado potato beetles.
Pests and Problems
Container potatoes have fewer soil problems, but pests still find them. Check the leaves every few days for beetles, their orange eggs and their larvae, and pick them off by hand. If the leaves develop brown spots in wet weather, remove the worst ones and water only at the base. Our guide to organic pest management covers other gentle methods.
Harvesting Your Container Potatoes
The harvest is the best part of this method, and timing depends on what you want.
New Potatoes
UMD notes that small, tender new potatoes can be harvested six to eight weeks after planting, usually once the plants have flowered. Reach gently into the side of the container and feel for tubers, taking a few and leaving the rest to grow.
Storage Potatoes
For a main crop, wait until the plants turn yellow and die back. UF says that most potatoes are ready in about three months, while UMD gives 90 to 120 days to maturity depending on the variety. If you plan to store them, UMD advises leaving the tubers in the soil for about two weeks after the tops die, so the skins thicken. Our guide to harvesting vegetables gives more signs of readiness for other crops.
The Easy Harvest
Now comes the reward for all that watering and hilling. Spread a tarp and tip the container over, then sift through the mix with your hands. There is no fork to spear the tubers, and the potatoes come out clean. Handle them gently, because UMD warns that bruises and cuts let in the fungi and bacteria that cause storage rot.
Curing and Storing Potatoes
Do not wash potatoes you plan to store, and simply brush off loose soil. UMD recommends curing them for 10 to 14 days at 50 to 60°F with high humidity, so that small wounds heal. After curing, store them in a dark place at 40 to 50°F with high humidity. Keep them away from light to prevent greening. Our guide to root cellar storage explains how to set up a cool storage space at home.
The used potting mix can go into the compost or be refreshed for a different crop next season. However, do not plant potatoes or tomatoes in it again straight away, since both belong to the same family and share diseases.
Frequently Asked Questions About How to Grow Potatoes in Containers
How many seed potatoes do I need to grow potatoes in containers?
Based on UMD’s spacing of 8 to 12 inches, a large bag of around 15 to 20 gallons holds three or four seed pieces. Crowding them gives more stems but smaller potatoes.
Can I grow potatoes in containers indoors?
Only with very strong light, which most homes cannot provide. Potatoes need at least six hours of direct sun, so a sunny patio or balcony is far easier than a windowsill.
Why are my container potatoes green?
They were exposed to light, either in the soil or during storage. Keep them covered by hilling, store them in the dark, and cut away any green parts before cooking.
Can I reuse the soil after I grow potatoes in containers?
Yes, but refresh it with compost and use it for a crop from a different family, such as beans or lettuce.
A Simple Start for Any Space
Learning to grow potatoes in containers is one of the easiest ways to begin vegetable gardening. Start with certified seed potatoes, a deep container that drains well and a rich potting mix. Then plant shallow, hill as the stems grow, water steadily and give the plants full sun. Skip the towers, harvest a few new potatoes early, and tip out the rest when the tops die back. For a sweeter crop with a different technique, see our guide to growing sweet potatoes.
Check out the author’s book here: The Year-Round Vegetable Garden for Beginners.


Leave a Reply